Difference between revisions of "Bouncing to Disk"
| Line 1: | Line 1: | ||
| − | Once your project is finished, you need to move it out of ProTools for use elsewhere. There are a couple of different ways to do this, and each method has its own purpose. This section covers '''Bouncing to Disk''', which | + | =Overview= |
| + | Once your project is finished, you need to move it out of ProTools for use elsewhere. There are a couple of different ways to do this, and each method has its own purpose. This section covers '''Bouncing to Disk''', which turns one or more recorded audio tracks into a single, useable .WAV file. If you're working with a longer piece, bouncing may not be the best or most time efficient method. Instead, you'd want to try '''[[Consolidating Tracks and Exporting Files]]'''. | ||
| − | ''' | + | ==Meet All KDHX Spot Requirements== |
| + | |||
| + | First things first, you must make sure that your spot meets the standards of the KDHX Production Department. | ||
| + | *Double check to make sure your final product complies with the requirements of the specific type of spot you're producing: | ||
| + | |||
| + | [[ File:Recording Type Chart.png ]] | ||
| + | |||
| + | Also make sure that: | ||
| + | |||
| + | *You've '''compressed''' and '''normalized''' your audio | ||
| + | *You're using the KDHX Radio Maximizer preset on your Master Track | ||
| + | *There is a half second of silence at the beginning | ||
| + | *There is NO extra silence at the end | ||
| + | *Your music (if necessary) is automated properly and mixes well with your voice | ||
| + | **For mixing purposes and automation, use the studio monitors rather than headphones. | ||
| + | **Make sure that every word is distinguishable and isn't masked by the music. | ||
| + | **Your final fade-out for music should not exceed a second or two after the voice stops (shorter is better). | ||
| + | |||
| + | =Bouncing= | ||
| + | |||
| + | If you've met all the above requirements and are sure your piece is radio ready, the bouncing process can begin. | ||
| + | |||
| + | '''1.''' Use the selector tool [[File:Select.png]] to highlight from the end of your piece to 00:00:00 on the timeline. This tells Pro Tools where to start and stop the bounce. Be sure to un-mute all tracks you want included in the bounce, and mute any unwanted tracks! Also, double check that you have a half second of silence at the beginning. | ||
*Note that in the example below, we have both muted the undesired track, and left a half second of silence at the very beginning. | *Note that in the example below, we have both muted the undesired track, and left a half second of silence at the very beginning. | ||
Revision as of 23:07, 14 January 2014
Overview
Once your project is finished, you need to move it out of ProTools for use elsewhere. There are a couple of different ways to do this, and each method has its own purpose. This section covers Bouncing to Disk, which turns one or more recorded audio tracks into a single, useable .WAV file. If you're working with a longer piece, bouncing may not be the best or most time efficient method. Instead, you'd want to try Consolidating Tracks and Exporting Files.
Meet All KDHX Spot Requirements
First things first, you must make sure that your spot meets the standards of the KDHX Production Department.
- Double check to make sure your final product complies with the requirements of the specific type of spot you're producing:
Also make sure that:
- You've compressed and normalized your audio
- You're using the KDHX Radio Maximizer preset on your Master Track
- There is a half second of silence at the beginning
- There is NO extra silence at the end
- Your music (if necessary) is automated properly and mixes well with your voice
- For mixing purposes and automation, use the studio monitors rather than headphones.
- Make sure that every word is distinguishable and isn't masked by the music.
- Your final fade-out for music should not exceed a second or two after the voice stops (shorter is better).
Bouncing
If you've met all the above requirements and are sure your piece is radio ready, the bouncing process can begin.
1. Use the selector tool ![]() to highlight from the end of your piece to 00:00:00 on the timeline. This tells Pro Tools where to start and stop the bounce. Be sure to un-mute all tracks you want included in the bounce, and mute any unwanted tracks! Also, double check that you have a half second of silence at the beginning.
to highlight from the end of your piece to 00:00:00 on the timeline. This tells Pro Tools where to start and stop the bounce. Be sure to un-mute all tracks you want included in the bounce, and mute any unwanted tracks! Also, double check that you have a half second of silence at the beginning.
- Note that in the example below, we have both muted the undesired track, and left a half second of silence at the very beginning.
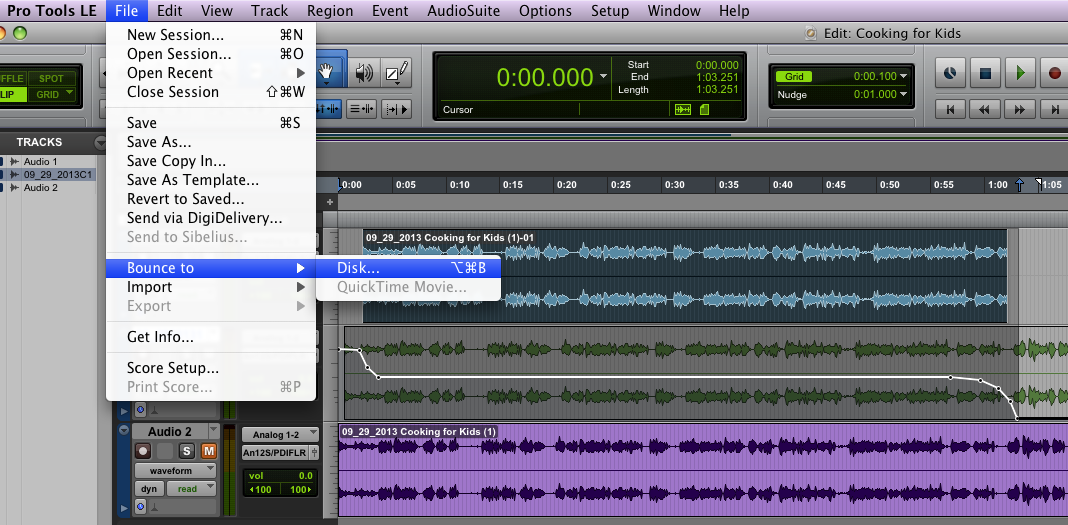
2. Once you've selected your desired audio tracks, go to File -> Bounce to -> Disk..., or type Option + Apple + B.
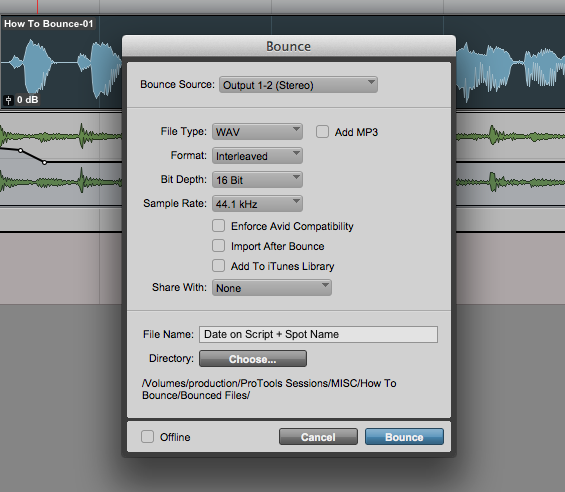
3. You will then be prompted to choose how you would like the audio formatted and where you would like to save the bounced file. Make sure that your settings match the following:
File Type - WAV, Format - Interleaved, Bit Depth - 16, Sample Rate - 44.1 as shown in the example below.
In addition, be sure you are saving your file in the "Bounced Files" folder within your project folder as "(Script Date) + (Script Name)." Click the "Choose" button next to "Directory:" to select this folder in Finder.
4. Hit Bounce, and your audio will begin bouncing in real time. This is the perfect opportunity to give your project one final listen to make sure that it sounds great from start to finish. When this process is complete, your project is ready to be used.
Your next step will be to upload your finished product to the Wide Orbit Automation System, which allows your piece to be played on the air.
Visit Wide Orbit Upload Procedure to learn how!

