Difference between revisions of "Wide Orbit Upload Procedure"
(→Uploading to Wide Orbit) |
(→Uploading to Wide Orbit) |
||
| Line 34: | Line 34: | ||
##You will use one of the following prefixes plus a 4-digit number (usually 000#). | ##You will use one of the following prefixes plus a 4-digit number (usually 000#). | ||
| − | [[ File:Prefix List.png]] | + | |
| + | [[ File:Prefix List.png|center]] | ||
| + | |||
[[ File:Prefix Search.png|thumb|left|Prefix Search Results]] | [[ File:Prefix Search.png|thumb|left|Prefix Search Results]] | ||
| − | * | + | *Now that you know which prefix to use, we must determine the last 4 digits of the file name. To do this you must check the Wide Orbit website listed as a bookmark in Google Chrome called "Wide Orbit Audio." Simply search for the prefix you're using and use the lowest number not currently in use by any other spots. |
*'''Note:''' In the example image to the left, the proper prefix/suffix combination is PR1 and 0007. We get 0007 by looking at the "Media Asset" column and focusing on which numbers have been used in the sequence. In this case, PR1/0006 is the last sequential "Media Asset" for a Promo, so our file will be renamed as PR10007.wav before we upload. | *'''Note:''' In the example image to the left, the proper prefix/suffix combination is PR1 and 0007. We get 0007 by looking at the "Media Asset" column and focusing on which numbers have been used in the sequence. In this case, PR1/0006 is the last sequential "Media Asset" for a Promo, so our file will be renamed as PR10007.wav before we upload. | ||
Revision as of 00:21, 26 February 2014
Contents
Overview
This page will guide you through the necessary steps for uploading your finished radio spot to the Wide Orbit Automation System. This is the system that allows your work to air and be heard by KDHX listeners. Pay very close attention to each detail for this. We don't want any mistakes to affect the Wide Orbit system or the way our listeners hear our programming.
Getting Started
- First you must make sure that your spot meets the standards of the KDHX Production Department.
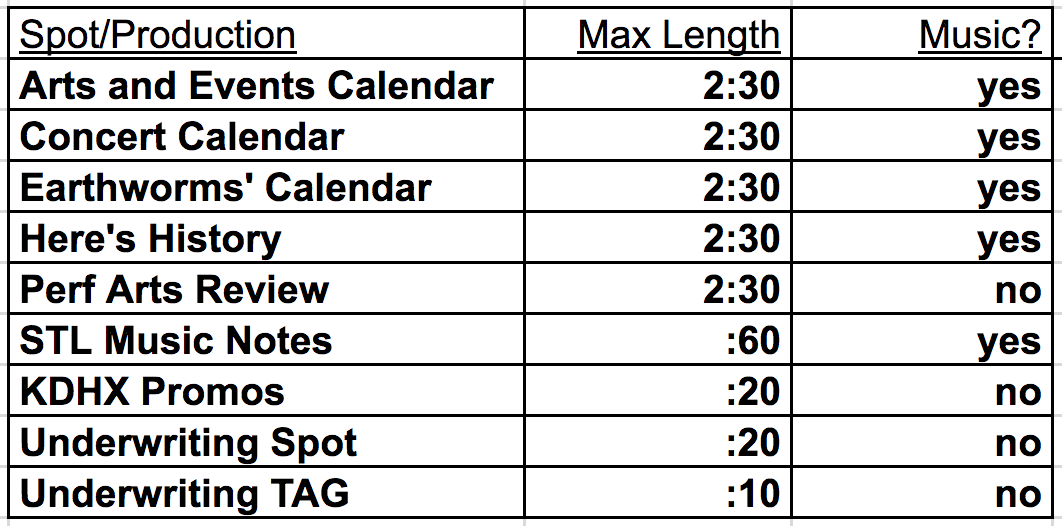
- Double check to make sure your final product complies with the requirements of the specific type of spot you're producing:
Also make sure that:
- You've compressed and normalized your audio
- There is a half second of silence at the beginning
- There is NO extra silence at the end
- Your music (if necessary) is automated properly and mixes well with your voice
- For mixing purposes and automation, use the studio monitors rather than headphones.
- Make sure that every word is distinguishable and isn't masked by the music.
- Your final fade-out for music should not exceed a second or two after the voice stops (shorter is better).
- If all of these requirements are met, make sure that your recorded and edited spot has been "bounced" properly (see Bouncing to Disk). Listen to it very closely for any mistakes, audible edits, or issues with level.
- When you've determined that your bounced file is 100% satisfactory for airing, you can begin the Wide Orbit upload process so the St. Louis area can hear your work!
Uploading to Wide Orbit
This is the process of transferring the .wav file you just bounced into the Wide Orbit Automation System. Here, it is important to name your files properly so that Wide Orbit can ingest them into the proper rotation.
- Find the audio file you just Bounced to Disk (it should be in the same folder as your Pro Tools session and should have the suffix ".wav."
- If the suffix is anything but ".wav," the upload will not work and you must re-bounce the file as a .wav from your session.
- Once you've found your final .wav file, you'll need to give it the proper name for Wide Orbit to ingest it into the proper rotation.
- Click on the name of your file to highlight it, then click again to rename the file.
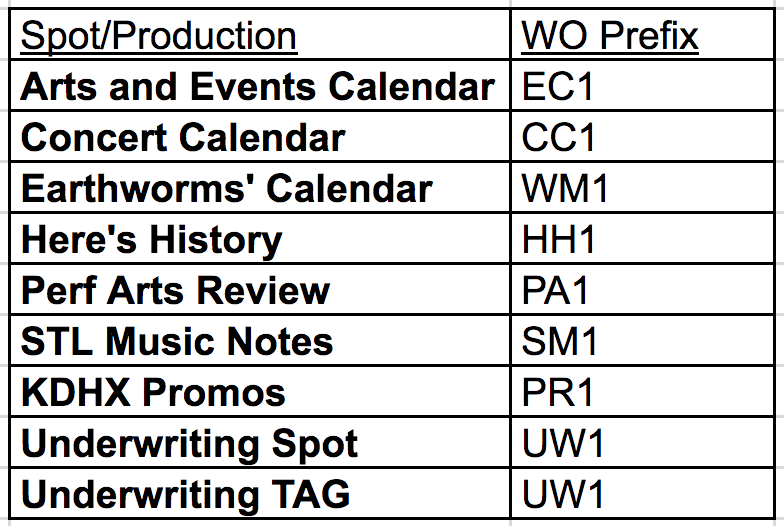
- There are many spot prefixes that Wide Orbit recognizes. It is essential for the name of your file to follow the naming protocols exactly.
- You will use one of the following prefixes plus a 4-digit number (usually 000#).
- Now that you know which prefix to use, we must determine the last 4 digits of the file name. To do this you must check the Wide Orbit website listed as a bookmark in Google Chrome called "Wide Orbit Audio." Simply search for the prefix you're using and use the lowest number not currently in use by any other spots.
- Note: In the example image to the left, the proper prefix/suffix combination is PR1 and 0007. We get 0007 by looking at the "Media Asset" column and focusing on which numbers have been used in the sequence. In this case, PR1/0006 is the last sequential "Media Asset" for a Promo, so our file will be renamed as PR10007.wav before we upload.
- Once you've renamed your file as (Prefix)####.wav, you will need to use the program Cyberduck to transfer the file to Wide Orbit.
Cyberduck
Open the Cyberduck program from the program dock.
Double click "Automation Import"
In the Finder Window where your bounced file is located, click and drag your file from Finder into the Cyberduck window.
In a moment, your file will be fully transferred into the Wide Orbit Automation System.
From here you will need to access Wide Orbit and change the metadata of your file to match your spot's criteria including date restrictions.
Updating Spot Info in Wide Orbit
- Number 1
- Number 2
- Number 2.1


