Difference between revisions of "Talk:Guide to Producing Live In-Studio Performance Videos"
m (moved Talk:Step-By-Step Guide to Producing Live In-Studio Performance Videos to Talk:Guide to Producing Live In-Studio Performance Videos: To avoid confusion with older title) |
|||
| Line 1: | Line 1: | ||
| − | + | ==Production== | |
| − | + | '''Important:''' Due to the location and shape of the LJW studio, photographers and videographers will at times have issues with the lighting in the room. Please review the document '''[[Lighting in the LJW Studios]]''' before your first video shoot. | |
| − | + | ===Camera positioning=== | |
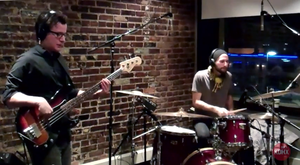
| − | + | Use between three and five cameras to cover all players. | |
| − | DSLR Use-need content | + | These shots are priorities: |
| + | |||
| + | :1. One flip camera locked down on the lead vocalist '''''(medium shot)'''''. | ||
| + | |||
| + | :[[File:shooting_lead_vocalist.jpg|400px]] | ||
| + | |||
| + | :2. One flip camera locked down on the drummer/rhythm section | ||
| + | :'''''(medium shot of drummer, or a medium two shot with guitarist or bassist)'''''. | ||
| + | |||
| + | :[[File:shooting_rhythm_section.jpg|300px]] '''OR''' [[File:shooting_drummer.jpg|300px]] | ||
| + | |||
| + | :3. One moving camera '''''(DSLR)''''' getting medium and close-up shots of the person of action (a singer or soloist). | ||
| + | |||
| + | :[[File:shooting_solo_guitar.jpg|400px]] | ||
| + | |||
| + | '''''Note:''''' KDHX would like for our talent to feel comfortable and at home in our studio, so the less "on camera" they feel, the better the performance. | ||
| + | |||
| + | Consider lessening the impact of using so many cameras with these tips: | ||
| + | |||
| + | :- Use small tripods for the flip cameras and place them strategically for close-ups and '''[http://en.wikipedia.org/wiki/Two_shot two-shots]''' so that they are less conspicuous to the performer(s). | ||
| + | |||
| + | :- Try to limit the camera crew to one person in the room as a DSLR operator. If a second videographer is available, they may be designated to checking and adjusting locked down flip cameras between songs. | ||
| + | |||
| + | ---- | ||
| + | |||
| + | ===Pointers=== | ||
| + | |||
| + | *'''NO ZOOM''': The flip cameras are High Definition (HD), but do not have optical zooms. Their digital zooms significantly decrease the quality of image, so using them is highly discouraged. | ||
| + | *For roving cameras like the DSLR, '''stick on each shot at least 10 seconds'''. (If you know anything about music, hold a shot for at least 8-16 bars of music.) | ||
| + | *'''Pay attention to the composition''' of your image. Framing your shot using the '''[http://en.wikipedia.org/wiki/Rule_of_thirds Rule of Thirds]''' makes for a more interesting image, moreso than a perfectly centered subject. | ||
| + | <br> | ||
| + | ::[[File:shooting_rule_of_3rds.jpg|500px]]<br> | ||
| + | *Make note of the elements within the margins of the frame. Are there mic stands, camera stands, doors, chairs, cables, etc. that could clutter edges of the shot or are in the background? If so, readjust or try to reduce background clutter from the room. Also, look for mic stands in front of the performers faces, as they will likely be a distraction as well. | ||
| + | *Move empty cases and coats to the lounge. | ||
| + | *When shooting, try not to violate the personal space of the performers. Use the zoom on the DSLR to get up close and personal, while maintaining distance from the performer(s). | ||
| + | *Be careful not to step into the view of the fixed cameras during the performances, or to place a camera in the view line of another camera. | ||
| + | *Try to re-adjust the locked down flip camera shots after each song, as the band may have slightly shifted positions. Re-positioning the flip cameras slightly different for each song will allow for multiple perspectives, and will make for a more interesting series of videos. | ||
| + | |||
| + | ==Shooting a Solo Act== | ||
| + | |||
| + | ''To view a model example of a solo session, refer to [http://youtu.be/DPndHeBNmlk Chris Mills] by Ed Kleinberg'' | ||
| + | |||
| + | When shooting a soloist, be careful to not break the '''[http://en.wikipedia.org/wiki/180-degree_rule 180-Degree rule]''', which is a basic guideline for video and film making that states: | ||
| + | :''"a character or other element'' (in our case the "other element" will usually be an instrument) ''in the same scene should always have the same left/right relationship to each other."'' | ||
| + | |||
| + | Please watch this short video explaining the concept simply and showing examples: '''[http://youtu.be/HdyyuqmCW14 Moviemaking Techniques180 Degree Rule]''' | ||
| + | |||
| + | ---- | ||
| + | |||
| + | Rather than placing the flip cameras all at medium shots around the artist, have one focused on the guitar or instrument, one on a medium shot of their upper body (never cut off a shot at the neck!), and also a medium shot to combine all of the elements. | ||
| + | |||
| + | '''Close-up of hands on instrument. (flip cam)''' | ||
| + | :[[File:solo_shooting_close_up.jpg|400px]] | ||
| + | |||
| + | '''Close-up on performers face, aka the "beauty" shot. (DSLR)''' | ||
| + | :[[File:solo_shooting_vocalist.jpg|400px]] | ||
| + | |||
| + | '''Medium shot. (flip cam)''' | ||
| + | :[[File:solo_shooting_medium.jpg|400px]] | ||
| + | |||
| + | ==Big no-no's== | ||
| + | |||
| + | '''People watching from windows''' | ||
| + | |||
| + | :[[File:shooting_bad_background.jpg|400px]] [[File:shooting_bad_background2.png|400px]] | ||
| + | |||
| + | '''Flip cameras are in the shot''' | ||
| + | |||
| + | :[[File:Flipcaminshot.png|400px]] | ||
| + | |||
| + | '''Open doors and blinds''' | ||
| + | |||
| + | :[[File:shooting_door_ajar.jpg|400px]] | ||
| + | |||
| + | '''''Remember:''''' A consistent background or "scene" is '''very''' important! | ||
| + | |||
| + | ==Post-Production== | ||
| + | '''As soon as the session is over:''' | ||
| + | :- turn off all cameras in use and replace lens caps on DSLR(s) | ||
| + | :- remove all cameras from tripods and return them to an A/V editing room | ||
| + | :- move all tripods used together against the walls and out of the way of workers and band members. | ||
| + | :- assist the band in moving themselves and equipment back to their van, as needed. | ||
| + | :- assist the Audio Engineer is straightening up the studio by winding cables, etc. | ||
| + | |||
| + | ===Preparing the audio and video footage for Final Cut Express=== | ||
| + | |||
| + | ====Getting started==== | ||
| + | :- Log in to the Video Production workstation with the volunteer password, which can be found on a sticker on the front of the Mac. | ||
| + | :- Attach the designated Video Firewire hard drive that you will be using for this project by plugging in its power supply and a firewire cable to the Mac. | ||
| + | |||
| + | ====Step 1: Creating a project folder==== | ||
| + | :- After the Firewire drive mounts and the volume icon appears, create a new folder on the drive to be used as your session's project folder. Title the new folder "'''Band Name Month-Date-Year'''." | ||
| + | ::'''''Example:''''' '''Bruiser Queen 2-19-14''' | ||
| + | :- Within this new project folder, create two new sub-folders and label them '''Raw footage''' and '''FCE Scratch'''. | ||
| + | |||
| + | ====Step 2: Creating song folders==== | ||
| + | |||
| + | :- When the engineer is finished mixing the audio files, they will copy 48k versions of the songs to the server: | ||
| + | ::'''afp://production-storage / Live In-Studio Peformance AV / 48K Audio for Video''' | ||
| + | :- The engineer will then send a Basecamp message, using the appropriate Audio milestone, with the log file attached. | ||
| + | :- The log file will include the name of the band, names of the songs performed, name of the Audio Engineer. the Deejay and the show's name. | ||
| + | |||
| + | :- For each song performed, create a separate file folder to store the video and audio data; title these according to the song's name and the track number in the session's sequence. | ||
| + | ::'''''examples:''''' '''1. Marianne, 2. Modern Beauty, 3. Purple, 4. Heavy''' | ||
| + | |||
| + | |||
| + | :A completed session folder will look something like this: | ||
| + | |||
| + | :[[File:directory-structure2.png|600px]] | ||
| + | |||
| + | ---- | ||
| + | |||
| + | ====Step 3: Moving video data from camera to drive==== | ||
| + | At the end of each shoot, the video files need to be transferred for to the hard drives for editing. | ||
| + | |||
| + | '''Flip cameras:''' | ||
| + | :- Plug the flip camera into a USB port. After a moment, the camera will turn on, and its icon will appear on the desktop. | ||
| + | :- Double-click the flip camera's desktop icon to view the file contents. | ||
| + | :- Locate the video files in the '''DCIM >100VIDEO''' folder, and drag these files into your project folder, into the folder labeled '''Raw footage'''. | ||
| + | |||
| + | :- After the file has finished copying to the '''Raw footage''' folder, dismount the flip camera by dragging its icon over the trash can. | ||
| + | :- Unplug the flip camera from the USB port. | ||
| + | :- Rename this video file by clicking on its title, and re-naming it using these elements: | ||
| + | ::- Artist name + camera # + subject + camera angle | ||
| + | ::- '''''Example:''''' '''Freedy Johnston cam3 wide.mp4''' or '''Quilt cam2 singer cu.mp4''' | ||
| + | ::- If you need to check the videos content before naming, you can easily preview them in Quicktime or MPEG Streamclip with a double click. | ||
| + | :- Repeat this process for all of the flip cameras that contain footage. | ||
| + | |||
| + | '''DSLR camera:''' | ||
| + | : - Make sure that the DSLR camera is powered OFF before removing the SD card. | ||
| + | :- Remove the SD card from the camera by pushing it in slightly, which will cause it to pop-out. Put the SD card into the memory card reader that is attached to the computer. After a moment, the SD card icon will appear on the desktop. | ||
| + | :- Double-click on the SD card icon to view the file contents. | ||
| + | :- Locate the video files in the '''DCIM > 100CANON''' folder, and drag these files to your project folder, in the the folder labeled '''Raw footage'''. | ||
| + | |||
| + | :- After the files have finished copying to the '''Raw footage''' folder, dismount the SD card by dragging its icon over the trash can. | ||
| + | :- Remove the SD card from the memory card reader by dragging its icon to the MAC trash can. | ||
| + | :- Double check that each clip transferred in it's entirety; the original file and the copied file should be the same exact file size and length. | ||
| + | |||
| + | :- Rename the new video files by clicking on its title, and re-naming it as: | ||
| + | ::'''''Example:''''' '''dslr song 1.MOV''', '''dslr song 2.MOV''', etc. | ||
| + | |||
| + | :'''''Important:''''' '''Do not''' re-title data or delete files while the flip cameras or the SD are mounted, or drag Flip videos from the camera to the Mac's trash. Files should be deleted manually from each of the flip cameras '''after''' the footage has been transferred and verified. The SD card should be re-formatted using the DSLR. | ||
| + | |||
| + | '''Formatting the SD card:''' | ||
| + | :[[File:PlayButton.png|30px]] | ||
| + | :- press the '''Play''' button on the back of the camera. | ||
| + | :- use the keypad to navigate to the first yellow screen with a wrench icon. | ||
| + | :- use the wheel or keypad to scroll down to '''Format'''. | ||
| + | :- press the '''Set''' button. | ||
| + | :- a dialogue will appear asking you to confirm that you would like to format the SD card. Using the arrow keys, navigate to '''OK'''. | ||
| + | : - press '''Set''' once again to confirm. | ||
| + | |||
| + | ====Post-production camera maintenance==== | ||
| + | After the cameras have been cleared of video data, they must be recharged for the next session. | ||
| + | |||
| + | The flip cameras will recharge while connected to a USB port, and will often take several hours to fully charge. | ||
| + | |||
| + | The DSLR has a removable battery pack which must be removed from the camera and plugged into the charger that resides in room A/V 3. | ||
| + | |||
| + | Flip the DSLR viewing screen to face the camera, protecting it for storage. | ||
| + | |||
| + | Place the DSLR in its bag and put back into storage, with tripod mounting plates left attached. | ||
| + | |||
| + | ---- | ||
| + | |||
| + | ====Step 4: Video file conversion==== | ||
| + | |||
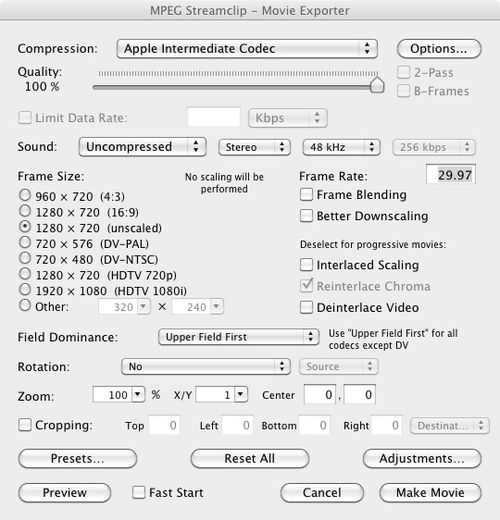
| + | Flip camera and DSLR footage cannot be used in its native raw format in the Final Cut Pro application without a lot of slow rendering. In order to save some time and to add ease in editing, it must be converted into a Quicktime movie using '''MPEG Streamclip''' software, and the '''Apple Intermediate Codec'''. It is equally important to convert footage in a per song format - that is, convert only the footage needed on a song by song basis and avoid converting all that was captured in mass. | ||
| + | |||
| + | ''Here is a short video demonstration of how Mpeg Streamclip's software works'' - '''[http://youtu.be/HzFKv6IW7fA?t=34s Mpeg Streamclip Tutorial]''' | ||
| + | |||
| + | ---- | ||
| + | |||
| + | :[[File:mpeg-steamclip.png|600px]] | ||
| + | |||
| + | - Open the MPEG Streamclip application, found on the navigation bar at the bottom of the screen.<br> | ||
| + | - Find the folder in your project labeled '''Raw footage'''.<br> | ||
| + | - Drag one of these files into the MPEG Streamclip viewer and locate the song that you are intending to convert. | ||
| + | |||
| + | - '''CRITICAL STEP''': Identify the start and end points of each song by marking them as '''In point''' and '''Out point'''. Use the timeline and play button to quickly move through the footage, using the '''I''' key to mark the "in" point and the '''O''' key for "out." Always allow for a few seconds of pre and post-roll for fades, etc. | ||
| + | |||
| + | - When the In and Out points are identified, select: '''File –> Export to QuickTime''' | ||
| + | |||
| + | - '''NOTE:''' If you are converting DSLR footage, please read '''[[#Converting DSLR footage|Converting DSLR footage]]''' in the section below before proceeding. | ||
| + | |||
| + | - Click on the '''Presets…''' button and choose '''KDHX: from Flip to AIC-FCE''', then click '''Load'''. | ||
| + | |||
| + | :'''The Movie Exporter window should look like this:'''<br> | ||
| + | :[[File:mpeg_presets.jpg|500px]] | ||
| + | |||
| + | :- Click on '''Make Movie''', then locate the appropriate project and song folder. | ||
| + | |||
| + | :- Save the new footage with a unique title in the '''Converted footage''' folder, including the '''song name''' at least, and reference to the '''subject'''. | ||
| + | ::'''''Example:''''' '''One Thing - singer.mov''' or '''One Thing - wide shot.mov''' | ||
| + | |||
| + | Repeat this process for each video and each song in the '''Raw footage''' folder '''''OR''''' use the '''Batch Process'''. | ||
| + | |||
| + | ---- | ||
| + | |||
| + | ====Converting DSLR footage==== | ||
| + | The DSLR footage is shot in a larger frame size than the footage from the flipcams. | ||
| + | :- Flipcam footage is shot at a frame size of 1280 x 720, the same size as the finished video that is ultimately published. | ||
| + | :- DSLR footage is shot at a frame size of 1920 x 1080. | ||
| + | |||
| + | You have one of two options for converting your DSLR footage: | ||
| + | :1. '''Converting to''' the same size of '''1920 x 1080''' ''(for when you wish you had gone closer on your DSLR shots)'' | ||
| + | ::- when you open the Movie Exporter screen, the '''Frame Size''' will default to 1920 x 1080 (unscaled) | ||
| + | |||
| + | ::::[[File:MEwdw1920x1080.png|260px]] | ||
| + | |||
| + | ::- '''''advantage''''' - if you want to enlarge your DSLR footage for a closer view of your subject, you have a larger range within to work. | ||
| + | ::- '''''disadvantage''''' - may cause longer and more frequent rendering times, depending on how much editing activity is done on that track. | ||
| + | |||
| + | |||
| + | :2. '''Converting to''' the size of flipcam footage, '''1280 x 720''' ''(for when you are happy with your DSLR footage and have no desire to enlarge it for editing)'' | ||
| + | ::- when you open the Movie Exporter screen, the Frame Size will default to 1920 x 1080 (unscaled) | ||
| + | ::- change the '''Frame Size''' by clicking the button for 1280 x 720 (HDTV 720p) | ||
| + | |||
| + | ::::[[File:MEwdw1280x720.png|260px]] | ||
| + | |||
| + | ::- '''''advantage''''' - all footage is the same size, saves on render time and frequency. | ||
| + | ::- '''''disadvantage''''' - does not allow for an enlargement without distortion to the image. | ||
| + | |||
| + | ---- | ||
| + | |||
| + | ====Batch process==== | ||
| + | |||
| + | Rather than setting up one song at a time and waiting for it to convert, you can use the application's '''Batch Process'''. This process allows you to set up all of your conversions and run them at once, allowing you to move on to another task while they convert in the background. | ||
| + | |||
| + | To initiate this function, choose '''View > List''' or use '''''Command + B''''', and the '''Batch List''' will appear. | ||
| + | |||
| + | :[[File:StreamclipBatchWindow.png|500px]] | ||
| + | |||
| + | Files can be added to the '''Batch List''' one at a time, or several files can be moved at once. To add files, '''''drag and drop''''' them into the Batch List window, or use the '''Add Files ...''' button. | ||
| + | |||
| + | When adding multiple files to the '''Batch List''' at the same time, consider the desired output, as they will all be converted using the same settings and folder designation. DSLR files should likely be added separately from the flipcam files. | ||
| + | |||
| + | Clips will appear in the list as they are added, click '''GO''' to begin processing. Each clip will take approximately three to four minutes to process. | ||
| + | ---- | ||
| + | |||
| + | ====Step 5: Obtaining audio files==== | ||
| + | |||
| + | Audio recorded in the studio must be matched to the video footage. The audio from the cameras will be muted in the final product, but when converted along with the footage into AIC/48K format, it will be helpful when synchronizing the engineered audio to the video images. | ||
| + | |||
| + | The audio engineers are instructed to convert the final mastered audio data into 48K AIF files for use with the video. They will edit the board audio into individual songs and interview segments, then create a text (rtf) file containing; | ||
| + | :- the song titles | ||
| + | :- the name of the Audio Engineer and assistants | ||
| + | :- the show host's name | ||
| + | :- the show title | ||
| + | :- the name of the videographer and assistants | ||
| + | |||
| + | These files will be accessible '''on the Production server''', in the transfer folder labeled '''Live Performance 48K Audio'''. | ||
| + | |||
| + | :- Connect to this server volume by choosing the Finder menu, then '''Go > Connect to Server''', or use the hotkey: '''Apple K'''. | ||
| + | |||
| + | :- From this list, choose '''flamingmac/production''', and '''Connect'''. | ||
| + | |||
| + | :- Locate the folder from your session, and copy it to your project folder. Re-title the new folder as '''48K audio'''. | ||
| + | |||
| + | :- Find the text (rtf) file in the 48K audio folder and open it to find the song and credit information. | ||
| + | |||
| + | ---- | ||
| + | |||
| + | ===Preparing to Edit in Final Cut Express (FCE)=== | ||
| + | |||
| + | ====The basics of Final Cut Express (FCE)==== | ||
| + | If you have never used Final Cut Express before, you may want to take a few minutes to watch a video or two demonstrating the basic features that you will be using as an editor. | ||
| + | |||
| + | '''Suggested videos for new users:'''<br> | ||
| + | :-[http://youtu.be/j4rjPFdrZyw?t=28s Basics of FCE]<br> | ||
| + | :-[http://youtu.be/Nj0VRX_VqjY?t=3m3s Beginning a new project in FCE]<br> | ||
| + | :-[http://www.izzyvideo.com/learn-final-cut-express-pt1 Final Cut Express Tutorial Video Series by Izzy Video.] | ||
| + | |||
| + | ---- | ||
| + | |||
| + | ====The Scratch Disks==== | ||
| + | |||
| + | '''THIS IS INCREDIBLY IMPORTANT!''' | ||
| + | |||
| + | '''Failure to take this step every time you work on a project can lead to the loss of data''' and significant changes to file organization. It would be best to '''check the Scratch Disks''' for accuracy every time you open and begin working in Final Cut Express. | ||
| + | |||
| + | While Final Cut is running it will regularly back up your project and will render composite data in the background. This data must remain with your project files, so that it will be accessible when needed; otherwise it will need to be re-created again later. The purpose of creating the '''FCE Scratch''' folder in the initial steps is to create a place to house the Final Cut Express files. Keeping all data for each session in the correct project file folder helps with organizational and backup needs. | ||
| + | |||
| + | '''Resetting the Scratch Disks''' | ||
| + | :1. Open Final Cut Express | ||
| + | |||
| + | :2. Make sure that any open projects are closed before proceeding. '''File > Close Project''' | ||
| + | |||
| + | :3. Reset the scratch disks by going to the menu '''Final Cut Express > System Settings''' | ||
| + | |||
| + | :4. For each button labeled '''Set...''', click and locate the drive and project folder that you are working with, find it's '''FCE Scratch''' folder and set it as the Scratch Disk. | ||
| + | |||
| + | :5. Repeat for '''Waveform Cache''', '''Thumbnail Cache''' and '''Autosave Vault'''. | ||
| + | |||
| + | ::[[File:scratch_disks_fce.png|600px]] | ||
| + | |||
| + | ---- | ||
| + | |||
| + | ====Creating a new project==== | ||
| + | |||
| + | :- Select '''File > New Project'''. A new sequence will open up, called '''Sequence 1'''. | ||
| + | |||
| + | :- Select: '''File > Save Project As…'''. Name the file using the Artist's name + the date, ''i.e., "Black Lips 5-2-14"'', and store it in the project folder. | ||
| + | |||
| + | :- Each '''sequence''' will become its own video. Each song will require its own '''sequence''', but all of the sequences will use the same FCE Scratch folder. | ||
| + | |||
| + | :- For each '''sequence''' (song), select '''File > New > Sequence''', or '''''Command + N''''', and choose '''HDV Apple Intermediate Codec 720p30'''. | ||
| + | |||
| + | ::[[File:SelectSequencePreset.png|400px]] | ||
| + | |||
| + | |||
| + | :When you are finished creating a sequence for each song, your project browser should look something like this ... | ||
| + | |||
| + | ::[[File:FCE_Sequences.png|500px]] | ||
| + | |||
| + | :- To change the name of each sequence, click on the sequence name twice, i.e., ''Sequence 1'', and rename it to the track number and the name of the song: | ||
| + | :: ex. ''"1. I Don't Wanna Hurt You"'' | ||
| + | ---- | ||
| + | |||
| + | ====Verifying the sequence settings==== | ||
| + | |||
| + | :- Right click on a sequence and select '''Item Properties'''. | ||
| + | |||
| + | :- From '''Vid Rate''' to the bottom, the settings should be exactly as shown here. | ||
| + | :: (The exception would be DSLR footage at a Frame Size of 1920x1080.) | ||
| + | |||
| + | ::[[File:sequence.jpg|600px]] | ||
| + | |||
| + | :- If you have not already changed the name of the sequence, click on the sequence '''Name''' twice, ''i.e., Sequence 1'', and rename it to the track number and the name of the song: | ||
| + | ::ex. ''"1. I Don't Wanna Hurt You"'' | ||
| + | |||
| + | :- Save by clicking the '''OK''' button. | ||
| + | |||
| + | ---- | ||
| + | |||
| + | ====Importing video and audio clips into Final Cut Express==== | ||
| + | :- From the menu, select '''File > New > Bin'''. (a '''Bin''' is a folder where you can store files without having them clutter the browser window.) | ||
| + | :- Double click on the new bin in the project '''Browser''', and rename it '''Clips'''. | ||
| + | :- Double click on this bin, it will open a new window. | ||
| + | |||
| + | :- From the menu, select '''File > Import > File…''' (or you can use '''''Command + I'''''.) | ||
| + | :- Find your way to your project folder, and to the folder for '''Converted footage'''. | ||
| + | :- Choose all of the audio and video files for the song and click on the '''Choose''' button. | ||
| + | :- All of the filenames should now appear in the '''Clips''' folder. | ||
| + | |||
| + | ---- | ||
| + | |||
| + | ====Placing video clips into the timeline==== | ||
| + | |||
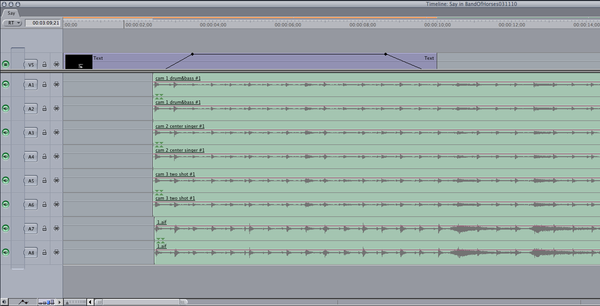
| + | :- Drop video files onto the timeline (see example below) one at a time, allowing the audio to snap into its own new track set. Start with '''V1''' and '''A1/A2'''. Then adjust your view so you can see the entire file with the tool outlined on the example below. | ||
| + | |||
| + | ::[[File:fceview-adjust.png|320px]] | ||
| + | |||
| + | :- Drag the rest of your video footage onto the video tracks ('''V2,''' '''V3''', etc). | ||
| + | |||
| + | '''Useful tricks:''' | ||
| + | :- to see the entire video in your timeline, click ''shift + Z'' | ||
| + | :- you can undo virtually any action with ''Command + Z'', or with the menu command '''Edit >Undo'''. | ||
| + | |||
| + | ---- | ||
| + | |||
| + | ====Syncing audio and video==== | ||
| + | Each of the video files will have associated audio which is viewable and is called a '''Waveform'''. You can use the audio '''waveform''' to synchronize the video footage. This audio will eventually be muted, and replaced with an audio file created by the Audio Engineer. | ||
| + | |||
| + | There are several methods that can be used to synchronize the audio to the video, we will discuss two of them here. | ||
| + | |||
| + | 1. '''By ear''' - if you are a musician and/or have a good sense of rhythm, using markers and placing them on the same beat on each track can help to quickly align all tracks.<br> | ||
| + | This YouTube video will demonstrate how to perform this type of synchronization. '''[http://youtu.be/52QnixGxaHg Synchronizing Multiple Tracks and Audio]''' | ||
| + | |||
| + | 2. '''By sight''' - Most commonly used method. By using zoom controls and displayed waveforms, you can line up the tracks as detailed below.<br> | ||
| + | This YouTube video will demonstrate how to perform this type of synchronization. '''[http://youtu.be/W6jvOqbe_qk Syncing Audio and Video by Waveform]''' | ||
| + | |||
| + | :- To view the audio waveform, click the menu arrow at the bottom left of the timeline and choose '''Show Audio Waveforms''', as shown in the example below. | ||
| + | |||
| + | ::[[File:fce-show-audio.png]] | ||
| + | |||
| + | :- Using the zoom and arrow mouse tools, line up the audio by looking for similarities in the waveform, specifically peaks where there is a loud sound or a drum beat. As the audio tracks are synchronized, so are the video tracks because they are linked to each other. | ||
| + | |||
| + | :-The 48k audio can be synchronized visually using this same method. | ||
| + | :- After you are sure assured that the footage is all in sync, mute the audio tracks for each video track, leaving the 48k audio as the sole sound source for the video. | ||
| + | |||
| + | |||
| + | ::'''This is what audio looks like when ''in sync'':''' | ||
| + | ::[[File:audio_in_sync.png|600px]] | ||
| + | |||
| + | ::'''This is what audio looks like when ''out of sync'':''' | ||
| + | ::[[File:audio_out_of_sync.png|600px]] | ||
| + | |||
| + | '''NOTE:''' If the video footage is a drastically different length than the audio track, there may be a mismatch in audio format (44.1k vs. 48k). The easiest way to verify the file data is to right click on it and choose '''View Properties'''. | ||
| + | : All of the '''audio''' should have the sample rate of '''48k'''. | ||
| + | : All '''video''' clips used in Final Cut Express should be '''AIC''' or '''Apple Intermediate Codec''' at '''1280×720'''. | ||
| + | |||
| + | '''OR''' you may have chosen the wrong song take when preparing to convert to '''AIC''' in MPEG Streamclip. | ||
| + | : Check the log file (band-name-date.rtf) for details about which take was used. | ||
| + | |||
| + | ---- | ||
| + | |||
| + | ===Editing using opacity in Final Cut Express (FCE)=== | ||
| + | |||
| + | '''BEFORE EDITING:''' If you have not done so already, verify the sequence settings by right-clicking on the sequence and selecting '''Settings'''. Make sure that '''Show Keyframe Overlays''' is checked. | ||
| + | |||
| + | ::[[File:settings_keyframes.jpg|300px]] | ||
| + | |||
| + | ::[[File:Show_Keyframe.png|300px]] | ||
| + | |||
| + | ---- | ||
| + | |||
| + | ====Shot selection and editing using opacity==== | ||
| + | |||
| + | : At the bottom left corner of Final Cut, click on the icon to view opacity dots on the video clips. | ||
| + | |||
| + | ::[[File:view-opacity-dots.png|240px]] | ||
| + | |||
| + | |||
| + | : Choose the '''pen''' mouse tool in the menu to your right, or use the short-cut '''P''', for pen. | ||
| + | |||
| + | ::[[File:pen_tool.png]] | ||
| + | |||
| + | ---- | ||
| + | |||
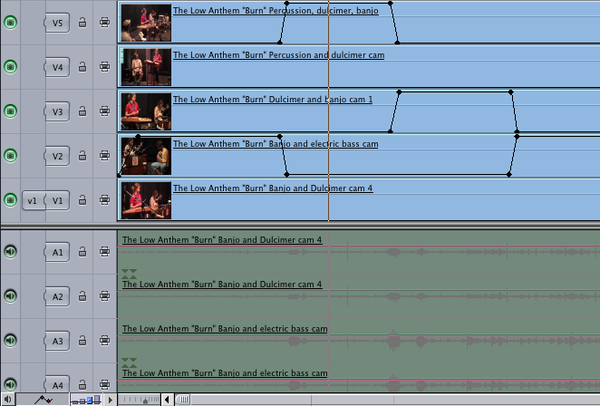
| + | ====How to edit with opacity==== | ||
| + | |||
| + | The video track on top, shown as track V5 in the example below, is the track that is ''viewable.'' The line and black dots indicate how visible the track is at any point in the timeline. | ||
| + | |||
| + | Using opacity controls and placing “dots” using the '''Pen tool''', you can choose which track is viewable by adjusting the black line up or down. | ||
| + | ::'''Note:''' If multiple tracks have their opacity set to 100%, the top-most track will be the one shown. | ||
| + | |||
| + | Here is a short video demonstrating the use of Opacity while editing. '''[http://youtu.be/IVL6U8braUY Working with Opacity]''' | ||
| + | |||
| + | ---- | ||
| + | |||
| + | ====Creating fades, dissolves and jump cuts==== | ||
| + | To create a transition to another track, begin by placing two dots on the visibility line you would like to change. | ||
| + | :- The length of the dissolve is determined by the severity of the angle between the dots. | ||
| + | :- A jump cut is vertical, an ascending or descending angle creates a dissolve or fade. | ||
| + | |||
| + | '''Transition tips''' | ||
| + | :- Use care cross-fading from one track to another. If they are not timed correctly, a third image from a lower track may creep into view. | ||
| + | :- Ideal fades are less than two seconds. If the song is up-tempo, use jump cuts or faster fades. | ||
| + | |||
| + | |||
| + | ::'''This is an example of using opacity dots to change the scene with dissolves, fades and cuts.''' | ||
| + | ::[[File:editing_with_opacity1.png|600px]] | ||
| + | |||
| + | ---- | ||
| + | |||
| + | ====Important editing tips==== | ||
| + | |||
| + | When editing live performances, remember the department motto: '''''"Show me what I'm hearing.''''''' | ||
| + | |||
| + | As the music changes focus between singers and solos, so should the video image. If someone is singing, show that, and if someone is taking a solo on a guitar or other instrument, show that as it is happening. | ||
| + | |||
| + | The main goal of producing these live session videos is to document the "for-radio performance," while providing an image that is aesthetically pleasing and informative. Be patient with your scene changes, the viewer is more interested in watching the musicians' craft than they are in fast-paced music video editing techniques. Too many quick edits can leave the viewer confused and they may lose interest. | ||
| + | |||
| + | :::'''Show me what I'm hearing!''' | ||
| + | |||
| + | '''NOTE:''' If Final Cut is working slowly and a pop-up window appears every time that a frame is dropped, you can work around this by selecting '''Unlimited RT''' in the '''RT tab''', next to the time-code in the Sequence Editor. Footage will play back with some lag while editing, but the audio will play smoothly. The final video will not have any lag. | ||
| + | |||
| + | :::[[File:unlimited_rt.jpg|300px]] | ||
| + | |||
| + | ---- | ||
| + | |||
| + | ====Preparing for Final Movie Export (Trimming, Fading, Etc.)==== | ||
| + | |||
| + | The beginning and ending of your video should contain a one to two second fade up from, or fade down to black. | ||
| + | |||
| + | To avoid additional black footage being added by Final Cut to the beginning or end of your final exported video, trim unused footage. | ||
| + | |||
| + | ::[[File:razor-blade.png|360px]] | ||
| + | |||
| + | |||
| + | If the audio track is clipped and does not end with a nice fade out, you can create one. Using the pencil tool, you can fade the last bit of audio, assuring a smooth ending. | ||
| + | ::[[File:fade-audio.png|300px]] | ||
| + | |||
| + | ---- | ||
| + | |||
| + | ===Color Correction=== | ||
| + | |||
| + | As the flip cameras get older, and with their color temperature set to automatic, you may need to do some color correction on your clips so that the footage matches in quality across all video footage. If lighting is good on all of the camera angles this is often necessary, however keep in mind that cameras pointed at or near the outside windows will likely require adjustment. | ||
| + | |||
| + | In most cases, the DSLR footage will have the best color and will be the one that you use as your "master" for hue correction. Good areas to use for color matching are the grey walls or a particularly colorful shirt or guitar. | ||
| + | |||
| + | This short video will demonstrate a quick trick to make footage matches quickly and easily. '''[http://youtu.be/2hwMf8YIih4?t=13s Final Cut Pro and Express Tutorial: Color Correction Tip]''' | ||
| + | |||
| + | Repeat for all of the clips that need correction. Use your eye and your good sense to tell when you think the color is matching between the different video tracks. | ||
| + | ::[[File:color_corrector.png|400px]] | ||
| + | |||
| + | Other adjustments that may help in color correction can be used to brighten or alter an image: | ||
| + | :- '''Whites:''' moving this slide to the left may help to dull bright whites from the outside windows. | ||
| + | :- '''Mids:''' in a heavily shadowed image, moving this slider to the right can help to bring detail out of the shadows. | ||
| + | :- '''Blacks:''' moving this slider to the left can help to sharpen image quality, while moving it to the right can help to bring out some hidden detail. | ||
| + | :- '''Sat:''' (color saturation) sliding the tab to the left will decrease the amount of color in your video, all the way to black and white if moved to the far left. Moving the slider to the right will increase the amount of color, and may help to improve image quality on washed on footage with too much light. | ||
| + | |||
| + | '''NOTE:''' Color correction settings are able to be copied and pasted to tracks across all of the songs in a session. Once one song has been color corrected, these '''''filters''''' can be copied to all of the tracks that come from the same camera. | ||
| + | |||
| + | ---- | ||
| + | |||
| + | ===Adding the KDHX Logo Bug and Titles=== | ||
| + | |||
| + | ::[[File:KDHX-logo-bug-2013.png|100px]] | ||
| + | |||
| + | The KDHX logo “bug” is an additional transparent layer added over the top of your video footage, and should fade up simultaneously from black in the opening shot. | ||
| + | |||
| + | At the end of the video, apply a one to two second fade to black, followed by a one second fade on the bug. This provides the viewer with a moment to see our logo. | ||
| + | |||
| + | :- On each drive, there is a file called '''KDHX-logo-bug-2013.png'''. Copy this file into your project folder. | ||
| + | :- After importing it into Finale Cut Express, drag the file to the top track of your timeline, above all of the other video tracks. | ||
| + | |||
| + | The length of the bug can be changed by: | ||
| + | :1. Dragging the file into the viewer, or double clicking it. | ||
| + | :2. Edit the time-code on the top left side of the Viewer, under the Video tab. | ||
| + | :3. Generally you will want to make it longer than it needs to be, then clip off the excess using the razor tool. | ||
| + | |||
| + | ---- | ||
| + | |||
| + | ===Exporting final video for review and approval=== | ||
| + | |||
| + | ====Preparing your video for a clean export==== | ||
| + | |||
| + | Before exporting your final video, you should perform the action to '''Render All'''. Any track that has been altered with Color Correction, opacity editing or any effects will require re-rendering, as well as all fades and dissolves. | ||
| + | |||
| + | Depending on the amount of alterations made to the video tracks, one song can take anywhere from 10 to 20 minutes to render. | ||
| + | :- Choose the menu commands '''Sequence –> Render All –> Both'''. | ||
| + | |||
| + | Once rendering is complete, you are ready to export your video. | ||
| + | :- With your selected song sequence in the Timeline, or highlighted in the Browser window, choose the menu commands '''File –> Export –> QuickTime Movie''' and use the default settings. | ||
| + | :- Title your new video using the Song Title, which should auto fill from the sequence name, and save it into the appropriate song folder. | ||
| + | |||
| + | ::[[File:export_to_quicktime.jpg|400px]] | ||
| + | |||
| + | ---- | ||
| + | |||
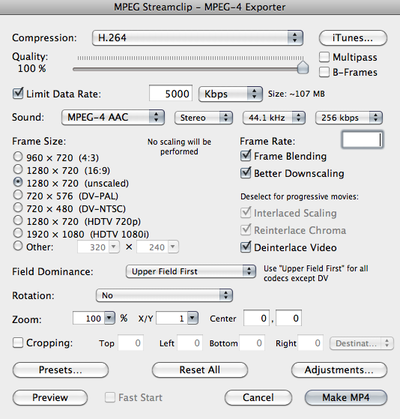
| + | ====Convert Video File to New Format With MPEG Streamclip==== | ||
| + | |||
| + | This next process will convert and compress your video for upload to YouTube. This process could be done when exporting your video from Final Cut, however it greatly increases the export time, and is prone to errors. The process using MPEG Streamclip for final conversion has been found to be the quickest and most time-saving. | ||
| + | |||
| + | - Open the application '''MPEG Streamclip'''. | ||
| + | |||
| + | ::[[File:MPGStreamclip.png|100px]] | ||
| + | |||
| + | - Drag one of your newly created videos for YouTube into the MPEG Streamclip viewer. | ||
| + | |||
| + | - From the menus, select: '''File -> Export to MPEG-4''' | ||
| + | |||
| + | - Click on the '''Presets...''' button and choose '''KDHX: YouTube Comp''', then click '''Load'''. | ||
| + | |||
| + | ::'''The Movie Exporter window should look like this:''' | ||
| + | ::[[File:mpeg-streamclip-export-settings-for-youtube.jpg|400px]] | ||
| + | |||
| + | :- Click on '''Make M4''', then locate the appropriate project and song folder. | ||
| + | |||
| + | :- Save the new file using the same title, and '''append YTC''' to the end of the filename, indicated that it is ''"YouTube Compressed."'' | ||
| + | ::'''''ex.'' 1. Feeling Groovy YTC''' | ||
| + | |||
| + | Repeat this process for each new video for YouTube that you have created. | ||
| + | |||
| + | '''NOTE:''' The export process will usually take between five and ten minutes per video. | ||
| + | |||
| + | ---- | ||
| + | |||
| + | ====Seeking Approval from a Peer Producer==== | ||
| + | |||
| + | Prior to uploading or publishing your video, a ''"second set of eyes"'' should review your video for potential problems. | ||
| + | |||
| + | The types of things that the reviewer should be watching for are; | ||
| + | :- extra black space at the beginning or end of the video and proper usage of KDHX bug. | ||
| + | :- non-performing members in the background, i.e., Audio Engineer, photographer, band entourage, etc. (this includes window reflections of same) | ||
| + | :- shots of band members looking bored or un-engaged | ||
| + | :- excessively short or long crossfades | ||
| + | :- bleedthrough of other tracks on crossfades | ||
| + | :- video glitches | ||
| + | :- confusing editing choices, ''i.e., "why do I hear an electric guitar playing a solo, but I can't see it?"'' | ||
| + | |||
| + | Each A/V workstation has a folder on the desktop linking to the '''REVIEW ME''' folder on the production server volume. | ||
| + | :- Double click on this folder to attach to the server and to view the folder's contents. | ||
| + | :- Move a copy of your YTC file to this folder. | ||
| + | |||
| + | Once your video(s) is in the '''REVIEW ME''' folder, find the Basecamp milestone for this session and make note that you are seeking approval to publish. Make sure that all of the Video Producers are copied in, as well as Andy and Valerie. This is accomplished by placing checkmarks by their names in the Basecamp message. | ||
| + | |||
| + | ::'''“Report the Wart"''' | ||
| + | |||
| + | ::In your Basecamp notes, you should ''"report the warts,"'' which means to identify anything in your video that may be perceived as an error, or as not being ideal. The note should contain any information about the edit that would be useful for the person reviewing it; ''i.e., "I would like to show a wide shot at the beginning, but two of the musicians were looking at their cell phones."'' | ||
| + | |||
| + | ::Including this information in your notes will help the reviewer avoid un-necessary instructions or feedback. | ||
| + | |||
| + | When the video has been approved, you will be instructed to upload your video to KDHX's YouTube channel. The reviewer will delete the copy of your YTC video from the '''REVIEW ME''' folder. | ||
| + | |||
| + | ==Publishing== | ||
| + | ===Logging into YouTube=== | ||
| + | - Go to [http://youtube.com Youtube] and log in to the KDHX account. This information can be obtained from Andy or another Video Producer. | ||
| + | |||
| + | :'''Be discreet with this password. If you are on a public computer, remember to log out after you are finished!''' | ||
| + | |||
| + | - Once you are logged in, make sure that you are logged into the correct account, which is the account with 4K subscribers. (see example below) | ||
| + | |||
| + | ::[[File:youtubeupload2.jpg|260px]] | ||
| + | |||
| + | ---- | ||
| + | |||
| + | ===Video file upload=== | ||
| + | - Click on the '''Upload''' button in the upper right corner of the YouTube window. | ||
| + | |||
| + | - Find the video you want to upload on your hard drive, drag and drop it in this window. | ||
| + | :[[File:YTEmptyUploadWdw.png|400px]] | ||
| + | |||
| + | -Fill in the title field completely, using the name of the band/act, the text "Live at KDHX" and the date in short format. | ||
| + | :'''''ex. Fanfarlo Live at KDHX 4/5/14''''' | ||
| + | |||
| + | :[[File:UploadFillIn.png|700px]] | ||
| + | |||
| + | The description field will be pre-filled with a template detailing how the finished information should be formatted. Fill in what you can of this information, but if there is something you do not know, leave the template item with the brackets. This happens most often with [LINK], [DJ] and [SHOW]. These items will be corrected in final review, before the video is made public. | ||
| + | |||
| + | - Five tags will pre-fill from the template. Do not worry about adding any tags for your video. Our tags are strictly formatted and will be added in final review. | ||
| + | |||
| + | - Privacy should be set to '''Private'''. | ||
| + | |||
| + | - When you are done filling in information for this video, click on the button that says '''Done'''. | ||
| + | |||
| + | - If you have other videos to upload, you can queue them up by using the '''Add More Files''' button on the lower right corner of the YouTube window. | ||
| + | |||
| + | - Log out of YouTube. | ||
| + | |||
| + | When you have finished uploading new videos, find the applicable Basecamp milestone and make note that the videos are now on YouTube, ready for final review. Be sure that Andy and Valerie are copied in on this request. | ||
| + | |||
| + | ===Final review process=== | ||
| + | - Andy or Valerie will review each video, looking for any problems that may have been missed. Comments may be provided; sometimes a video may be rejected for use or sent for repair. All of these communications are handled via Basecamp. | ||
| + | |||
| + | - Reviewer will double check band and song names for accuracy, fill in any missing information from the video description, and add tags for each video. | ||
| + | |||
| + | - Once reviewed, the videos are compiled into YouTube playlists, published and appended to a KDHX.org article about the live session. Notification of publication will be sent via Basecamp and seeded to Facebook. | ||
| + | |||
| + | [[Category:Video]] | ||
Revision as of 15:55, 4 September 2014
Contents
- 1 Production
- 2 Shooting a Solo Act
- 3 Big no-no's
- 4 Post-Production
- 4.1 Preparing the audio and video footage for Final Cut Express
- 4.1.1 Getting started
- 4.1.2 Step 1: Creating a project folder
- 4.1.3 Step 2: Creating song folders
- 4.1.4 Step 3: Moving video data from camera to drive
- 4.1.5 Post-production camera maintenance
- 4.1.6 Step 4: Video file conversion
- 4.1.7 Converting DSLR footage
- 4.1.8 Batch process
- 4.1.9 Step 5: Obtaining audio files
- 4.2 Preparing to Edit in Final Cut Express (FCE)
- 4.3 Editing using opacity in Final Cut Express (FCE)
- 4.4 Color Correction
- 4.5 Adding the KDHX Logo Bug and Titles
- 4.6 Exporting final video for review and approval
- 4.1 Preparing the audio and video footage for Final Cut Express
- 5 Publishing
Production
Important: Due to the location and shape of the LJW studio, photographers and videographers will at times have issues with the lighting in the room. Please review the document Lighting in the LJW Studios before your first video shoot.
Camera positioning
Use between three and five cameras to cover all players.
These shots are priorities:
- 1. One flip camera locked down on the lead vocalist (medium shot).

- 2. One flip camera locked down on the drummer/rhythm section
- (medium shot of drummer, or a medium two shot with guitarist or bassist).
 OR
OR 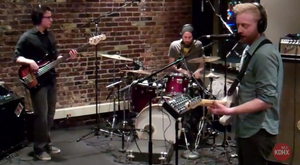


- 3. One moving camera (DSLR) getting medium and close-up shots of the person of action (a singer or soloist).

Note: KDHX would like for our talent to feel comfortable and at home in our studio, so the less "on camera" they feel, the better the performance.
Consider lessening the impact of using so many cameras with these tips:
- - Use small tripods for the flip cameras and place them strategically for close-ups and two-shots so that they are less conspicuous to the performer(s).
- - Try to limit the camera crew to one person in the room as a DSLR operator. If a second videographer is available, they may be designated to checking and adjusting locked down flip cameras between songs.
Pointers
- NO ZOOM: The flip cameras are High Definition (HD), but do not have optical zooms. Their digital zooms significantly decrease the quality of image, so using them is highly discouraged.
- For roving cameras like the DSLR, stick on each shot at least 10 seconds. (If you know anything about music, hold a shot for at least 8-16 bars of music.)
- Pay attention to the composition of your image. Framing your shot using the Rule of Thirds makes for a more interesting image, moreso than a perfectly centered subject.

- Make note of the elements within the margins of the frame. Are there mic stands, camera stands, doors, chairs, cables, etc. that could clutter edges of the shot or are in the background? If so, readjust or try to reduce background clutter from the room. Also, look for mic stands in front of the performers faces, as they will likely be a distraction as well.
- Move empty cases and coats to the lounge.
- When shooting, try not to violate the personal space of the performers. Use the zoom on the DSLR to get up close and personal, while maintaining distance from the performer(s).
- Be careful not to step into the view of the fixed cameras during the performances, or to place a camera in the view line of another camera.
- Try to re-adjust the locked down flip camera shots after each song, as the band may have slightly shifted positions. Re-positioning the flip cameras slightly different for each song will allow for multiple perspectives, and will make for a more interesting series of videos.
Shooting a Solo Act
To view a model example of a solo session, refer to Chris Mills by Ed Kleinberg
When shooting a soloist, be careful to not break the 180-Degree rule, which is a basic guideline for video and film making that states:
- "a character or other element (in our case the "other element" will usually be an instrument) in the same scene should always have the same left/right relationship to each other."
Please watch this short video explaining the concept simply and showing examples: Moviemaking Techniques180 Degree Rule
Rather than placing the flip cameras all at medium shots around the artist, have one focused on the guitar or instrument, one on a medium shot of their upper body (never cut off a shot at the neck!), and also a medium shot to combine all of the elements.
Close-up of hands on instrument. (flip cam)

Close-up on performers face, aka the "beauty" shot. (DSLR)

Medium shot. (flip cam)

Big no-no's
People watching from windows


Flip cameras are in the shot

Open doors and blinds

Remember: A consistent background or "scene" is very important!
Post-Production
As soon as the session is over:
- - turn off all cameras in use and replace lens caps on DSLR(s)
- - remove all cameras from tripods and return them to an A/V editing room
- - move all tripods used together against the walls and out of the way of workers and band members.
- - assist the band in moving themselves and equipment back to their van, as needed.
- - assist the Audio Engineer is straightening up the studio by winding cables, etc.
Preparing the audio and video footage for Final Cut Express
Getting started
- - Log in to the Video Production workstation with the volunteer password, which can be found on a sticker on the front of the Mac.
- - Attach the designated Video Firewire hard drive that you will be using for this project by plugging in its power supply and a firewire cable to the Mac.
Step 1: Creating a project folder
- - After the Firewire drive mounts and the volume icon appears, create a new folder on the drive to be used as your session's project folder. Title the new folder "Band Name Month-Date-Year."
- Example: Bruiser Queen 2-19-14
- - Within this new project folder, create two new sub-folders and label them Raw footage and FCE Scratch.
Step 2: Creating song folders
- - When the engineer is finished mixing the audio files, they will copy 48k versions of the songs to the server:
- afp://production-storage / Live In-Studio Peformance AV / 48K Audio for Video
- - The engineer will then send a Basecamp message, using the appropriate Audio milestone, with the log file attached.
- - The log file will include the name of the band, names of the songs performed, name of the Audio Engineer. the Deejay and the show's name.
- - For each song performed, create a separate file folder to store the video and audio data; title these according to the song's name and the track number in the session's sequence.
- examples: 1. Marianne, 2. Modern Beauty, 3. Purple, 4. Heavy
- A completed session folder will look something like this:

Step 3: Moving video data from camera to drive
At the end of each shoot, the video files need to be transferred for to the hard drives for editing.
Flip cameras:
- - Plug the flip camera into a USB port. After a moment, the camera will turn on, and its icon will appear on the desktop.
- - Double-click the flip camera's desktop icon to view the file contents.
- - Locate the video files in the DCIM >100VIDEO folder, and drag these files into your project folder, into the folder labeled Raw footage.
- - After the file has finished copying to the Raw footage folder, dismount the flip camera by dragging its icon over the trash can.
- - Unplug the flip camera from the USB port.
- - Rename this video file by clicking on its title, and re-naming it using these elements:
- - Artist name + camera # + subject + camera angle
- - Example: Freedy Johnston cam3 wide.mp4 or Quilt cam2 singer cu.mp4
- - If you need to check the videos content before naming, you can easily preview them in Quicktime or MPEG Streamclip with a double click.
- - Repeat this process for all of the flip cameras that contain footage.
DSLR camera:
- - Make sure that the DSLR camera is powered OFF before removing the SD card.
- - Remove the SD card from the camera by pushing it in slightly, which will cause it to pop-out. Put the SD card into the memory card reader that is attached to the computer. After a moment, the SD card icon will appear on the desktop.
- - Double-click on the SD card icon to view the file contents.
- - Locate the video files in the DCIM > 100CANON folder, and drag these files to your project folder, in the the folder labeled Raw footage.
- - After the files have finished copying to the Raw footage folder, dismount the SD card by dragging its icon over the trash can.
- - Remove the SD card from the memory card reader by dragging its icon to the MAC trash can.
- - Double check that each clip transferred in it's entirety; the original file and the copied file should be the same exact file size and length.
- - Rename the new video files by clicking on its title, and re-naming it as:
- Example: dslr song 1.MOV, dslr song 2.MOV, etc.
- Important: Do not re-title data or delete files while the flip cameras or the SD are mounted, or drag Flip videos from the camera to the Mac's trash. Files should be deleted manually from each of the flip cameras after the footage has been transferred and verified. The SD card should be re-formatted using the DSLR.
Formatting the SD card:

- - press the Play button on the back of the camera.
- - use the keypad to navigate to the first yellow screen with a wrench icon.
- - use the wheel or keypad to scroll down to Format.
- - press the Set button.
- - a dialogue will appear asking you to confirm that you would like to format the SD card. Using the arrow keys, navigate to OK.
- - press Set once again to confirm.
Post-production camera maintenance
After the cameras have been cleared of video data, they must be recharged for the next session.
The flip cameras will recharge while connected to a USB port, and will often take several hours to fully charge.
The DSLR has a removable battery pack which must be removed from the camera and plugged into the charger that resides in room A/V 3.
Flip the DSLR viewing screen to face the camera, protecting it for storage.
Place the DSLR in its bag and put back into storage, with tripod mounting plates left attached.
Step 4: Video file conversion
Flip camera and DSLR footage cannot be used in its native raw format in the Final Cut Pro application without a lot of slow rendering. In order to save some time and to add ease in editing, it must be converted into a Quicktime movie using MPEG Streamclip software, and the Apple Intermediate Codec. It is equally important to convert footage in a per song format - that is, convert only the footage needed on a song by song basis and avoid converting all that was captured in mass.
Here is a short video demonstration of how Mpeg Streamclip's software works - Mpeg Streamclip Tutorial

- Open the MPEG Streamclip application, found on the navigation bar at the bottom of the screen.
- Find the folder in your project labeled Raw footage.
- Drag one of these files into the MPEG Streamclip viewer and locate the song that you are intending to convert.
- CRITICAL STEP: Identify the start and end points of each song by marking them as In point and Out point. Use the timeline and play button to quickly move through the footage, using the I key to mark the "in" point and the O key for "out." Always allow for a few seconds of pre and post-roll for fades, etc.
- When the In and Out points are identified, select: File –> Export to QuickTime
- NOTE: If you are converting DSLR footage, please read Converting DSLR footage in the section below before proceeding.
- Click on the Presets… button and choose KDHX: from Flip to AIC-FCE, then click Load.
- The Movie Exporter window should look like this:

- - Click on Make Movie, then locate the appropriate project and song folder.
- - Save the new footage with a unique title in the Converted footage folder, including the song name at least, and reference to the subject.
- Example: One Thing - singer.mov or One Thing - wide shot.mov
Repeat this process for each video and each song in the Raw footage folder OR use the Batch Process.
Converting DSLR footage
The DSLR footage is shot in a larger frame size than the footage from the flipcams.
- - Flipcam footage is shot at a frame size of 1280 x 720, the same size as the finished video that is ultimately published.
- - DSLR footage is shot at a frame size of 1920 x 1080.
You have one of two options for converting your DSLR footage:
- 1. Converting to the same size of 1920 x 1080 (for when you wish you had gone closer on your DSLR shots)
- - when you open the Movie Exporter screen, the Frame Size will default to 1920 x 1080 (unscaled)

- - advantage - if you want to enlarge your DSLR footage for a closer view of your subject, you have a larger range within to work.
- - disadvantage - may cause longer and more frequent rendering times, depending on how much editing activity is done on that track.
- 2. Converting to the size of flipcam footage, 1280 x 720 (for when you are happy with your DSLR footage and have no desire to enlarge it for editing)
- - when you open the Movie Exporter screen, the Frame Size will default to 1920 x 1080 (unscaled)
- - change the Frame Size by clicking the button for 1280 x 720 (HDTV 720p)

- - advantage - all footage is the same size, saves on render time and frequency.
- - disadvantage - does not allow for an enlargement without distortion to the image.
Batch process
Rather than setting up one song at a time and waiting for it to convert, you can use the application's Batch Process. This process allows you to set up all of your conversions and run them at once, allowing you to move on to another task while they convert in the background.
To initiate this function, choose View > List or use Command + B, and the Batch List will appear.

Files can be added to the Batch List one at a time, or several files can be moved at once. To add files, drag and drop them into the Batch List window, or use the Add Files ... button.
When adding multiple files to the Batch List at the same time, consider the desired output, as they will all be converted using the same settings and folder designation. DSLR files should likely be added separately from the flipcam files.
Clips will appear in the list as they are added, click GO to begin processing. Each clip will take approximately three to four minutes to process.
Step 5: Obtaining audio files
Audio recorded in the studio must be matched to the video footage. The audio from the cameras will be muted in the final product, but when converted along with the footage into AIC/48K format, it will be helpful when synchronizing the engineered audio to the video images.
The audio engineers are instructed to convert the final mastered audio data into 48K AIF files for use with the video. They will edit the board audio into individual songs and interview segments, then create a text (rtf) file containing;
- - the song titles
- - the name of the Audio Engineer and assistants
- - the show host's name
- - the show title
- - the name of the videographer and assistants
These files will be accessible on the Production server, in the transfer folder labeled Live Performance 48K Audio.
- - Connect to this server volume by choosing the Finder menu, then Go > Connect to Server, or use the hotkey: Apple K.
- - From this list, choose flamingmac/production, and Connect.
- - Locate the folder from your session, and copy it to your project folder. Re-title the new folder as 48K audio.
- - Find the text (rtf) file in the 48K audio folder and open it to find the song and credit information.
Preparing to Edit in Final Cut Express (FCE)
The basics of Final Cut Express (FCE)
If you have never used Final Cut Express before, you may want to take a few minutes to watch a video or two demonstrating the basic features that you will be using as an editor.
Suggested videos for new users:
- -Basics of FCE
- -Beginning a new project in FCE
- -Final Cut Express Tutorial Video Series by Izzy Video.
The Scratch Disks
THIS IS INCREDIBLY IMPORTANT!
Failure to take this step every time you work on a project can lead to the loss of data and significant changes to file organization. It would be best to check the Scratch Disks for accuracy every time you open and begin working in Final Cut Express.
While Final Cut is running it will regularly back up your project and will render composite data in the background. This data must remain with your project files, so that it will be accessible when needed; otherwise it will need to be re-created again later. The purpose of creating the FCE Scratch folder in the initial steps is to create a place to house the Final Cut Express files. Keeping all data for each session in the correct project file folder helps with organizational and backup needs.
Resetting the Scratch Disks
- 1. Open Final Cut Express
- 2. Make sure that any open projects are closed before proceeding. File > Close Project
- 3. Reset the scratch disks by going to the menu Final Cut Express > System Settings
- 4. For each button labeled Set..., click and locate the drive and project folder that you are working with, find it's FCE Scratch folder and set it as the Scratch Disk.
- 5. Repeat for Waveform Cache, Thumbnail Cache and Autosave Vault.

Creating a new project
- - Select File > New Project. A new sequence will open up, called Sequence 1.
- - Select: File > Save Project As…. Name the file using the Artist's name + the date, i.e., "Black Lips 5-2-14", and store it in the project folder.
- - Each sequence will become its own video. Each song will require its own sequence, but all of the sequences will use the same FCE Scratch folder.
- - For each sequence (song), select File > New > Sequence, or Command + N, and choose HDV Apple Intermediate Codec 720p30.

- When you are finished creating a sequence for each song, your project browser should look something like this ...

- - To change the name of each sequence, click on the sequence name twice, i.e., Sequence 1, and rename it to the track number and the name of the song:
- ex. "1. I Don't Wanna Hurt You"
Verifying the sequence settings
- - Right click on a sequence and select Item Properties.
- - From Vid Rate to the bottom, the settings should be exactly as shown here.
- (The exception would be DSLR footage at a Frame Size of 1920x1080.)

- - If you have not already changed the name of the sequence, click on the sequence Name twice, i.e., Sequence 1, and rename it to the track number and the name of the song:
- ex. "1. I Don't Wanna Hurt You"
- - Save by clicking the OK button.
Importing video and audio clips into Final Cut Express
- - From the menu, select File > New > Bin. (a Bin is a folder where you can store files without having them clutter the browser window.)
- - Double click on the new bin in the project Browser, and rename it Clips.
- - Double click on this bin, it will open a new window.
- - From the menu, select File > Import > File… (or you can use Command + I.)
- - Find your way to your project folder, and to the folder for Converted footage.
- - Choose all of the audio and video files for the song and click on the Choose button.
- - All of the filenames should now appear in the Clips folder.
Placing video clips into the timeline
- - Drop video files onto the timeline (see example below) one at a time, allowing the audio to snap into its own new track set. Start with V1 and A1/A2. Then adjust your view so you can see the entire file with the tool outlined on the example below.

- - Drag the rest of your video footage onto the video tracks (V2, V3, etc).
Useful tricks:
- - to see the entire video in your timeline, click shift + Z
- - you can undo virtually any action with Command + Z, or with the menu command Edit >Undo.
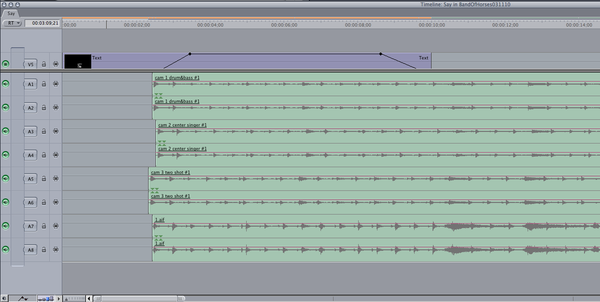
Syncing audio and video
Each of the video files will have associated audio which is viewable and is called a Waveform. You can use the audio waveform to synchronize the video footage. This audio will eventually be muted, and replaced with an audio file created by the Audio Engineer.
There are several methods that can be used to synchronize the audio to the video, we will discuss two of them here.
1. By ear - if you are a musician and/or have a good sense of rhythm, using markers and placing them on the same beat on each track can help to quickly align all tracks.
This YouTube video will demonstrate how to perform this type of synchronization. Synchronizing Multiple Tracks and Audio
2. By sight - Most commonly used method. By using zoom controls and displayed waveforms, you can line up the tracks as detailed below.
This YouTube video will demonstrate how to perform this type of synchronization. Syncing Audio and Video by Waveform
- - To view the audio waveform, click the menu arrow at the bottom left of the timeline and choose Show Audio Waveforms, as shown in the example below.

- - Using the zoom and arrow mouse tools, line up the audio by looking for similarities in the waveform, specifically peaks where there is a loud sound or a drum beat. As the audio tracks are synchronized, so are the video tracks because they are linked to each other.
- -The 48k audio can be synchronized visually using this same method.
- - After you are sure assured that the footage is all in sync, mute the audio tracks for each video track, leaving the 48k audio as the sole sound source for the video.
- This is what audio looks like when in sync:

- This is what audio looks like when out of sync:

NOTE: If the video footage is a drastically different length than the audio track, there may be a mismatch in audio format (44.1k vs. 48k). The easiest way to verify the file data is to right click on it and choose View Properties.
- All of the audio should have the sample rate of 48k.
- All video clips used in Final Cut Express should be AIC or Apple Intermediate Codec at 1280×720.
OR you may have chosen the wrong song take when preparing to convert to AIC in MPEG Streamclip.
- Check the log file (band-name-date.rtf) for details about which take was used.
Editing using opacity in Final Cut Express (FCE)
BEFORE EDITING: If you have not done so already, verify the sequence settings by right-clicking on the sequence and selecting Settings. Make sure that Show Keyframe Overlays is checked.


Shot selection and editing using opacity
- At the bottom left corner of Final Cut, click on the icon to view opacity dots on the video clips.

- Choose the pen mouse tool in the menu to your right, or use the short-cut P, for pen.
How to edit with opacity
The video track on top, shown as track V5 in the example below, is the track that is viewable. The line and black dots indicate how visible the track is at any point in the timeline.
Using opacity controls and placing “dots” using the Pen tool, you can choose which track is viewable by adjusting the black line up or down.
- Note: If multiple tracks have their opacity set to 100%, the top-most track will be the one shown.
Here is a short video demonstrating the use of Opacity while editing. Working with Opacity
Creating fades, dissolves and jump cuts
To create a transition to another track, begin by placing two dots on the visibility line you would like to change.
- - The length of the dissolve is determined by the severity of the angle between the dots.
- - A jump cut is vertical, an ascending or descending angle creates a dissolve or fade.
Transition tips
- - Use care cross-fading from one track to another. If they are not timed correctly, a third image from a lower track may creep into view.
- - Ideal fades are less than two seconds. If the song is up-tempo, use jump cuts or faster fades.
- This is an example of using opacity dots to change the scene with dissolves, fades and cuts.

Important editing tips
When editing live performances, remember the department motto: "Show me what I'm hearing.''
As the music changes focus between singers and solos, so should the video image. If someone is singing, show that, and if someone is taking a solo on a guitar or other instrument, show that as it is happening.
The main goal of producing these live session videos is to document the "for-radio performance," while providing an image that is aesthetically pleasing and informative. Be patient with your scene changes, the viewer is more interested in watching the musicians' craft than they are in fast-paced music video editing techniques. Too many quick edits can leave the viewer confused and they may lose interest.
- Show me what I'm hearing!
NOTE: If Final Cut is working slowly and a pop-up window appears every time that a frame is dropped, you can work around this by selecting Unlimited RT in the RT tab, next to the time-code in the Sequence Editor. Footage will play back with some lag while editing, but the audio will play smoothly. The final video will not have any lag.

Preparing for Final Movie Export (Trimming, Fading, Etc.)
The beginning and ending of your video should contain a one to two second fade up from, or fade down to black.
To avoid additional black footage being added by Final Cut to the beginning or end of your final exported video, trim unused footage.

If the audio track is clipped and does not end with a nice fade out, you can create one. Using the pencil tool, you can fade the last bit of audio, assuring a smooth ending.

Color Correction
As the flip cameras get older, and with their color temperature set to automatic, you may need to do some color correction on your clips so that the footage matches in quality across all video footage. If lighting is good on all of the camera angles this is often necessary, however keep in mind that cameras pointed at or near the outside windows will likely require adjustment.
In most cases, the DSLR footage will have the best color and will be the one that you use as your "master" for hue correction. Good areas to use for color matching are the grey walls or a particularly colorful shirt or guitar.
This short video will demonstrate a quick trick to make footage matches quickly and easily. Final Cut Pro and Express Tutorial: Color Correction Tip
Repeat for all of the clips that need correction. Use your eye and your good sense to tell when you think the color is matching between the different video tracks.

Other adjustments that may help in color correction can be used to brighten or alter an image:
- - Whites: moving this slide to the left may help to dull bright whites from the outside windows.
- - Mids: in a heavily shadowed image, moving this slider to the right can help to bring detail out of the shadows.
- - Blacks: moving this slider to the left can help to sharpen image quality, while moving it to the right can help to bring out some hidden detail.
- - Sat: (color saturation) sliding the tab to the left will decrease the amount of color in your video, all the way to black and white if moved to the far left. Moving the slider to the right will increase the amount of color, and may help to improve image quality on washed on footage with too much light.
NOTE: Color correction settings are able to be copied and pasted to tracks across all of the songs in a session. Once one song has been color corrected, these filters can be copied to all of the tracks that come from the same camera.
Adding the KDHX Logo Bug and Titles
The KDHX logo “bug” is an additional transparent layer added over the top of your video footage, and should fade up simultaneously from black in the opening shot.
At the end of the video, apply a one to two second fade to black, followed by a one second fade on the bug. This provides the viewer with a moment to see our logo.
- - On each drive, there is a file called KDHX-logo-bug-2013.png. Copy this file into your project folder.
- - After importing it into Finale Cut Express, drag the file to the top track of your timeline, above all of the other video tracks.
The length of the bug can be changed by:
- 1. Dragging the file into the viewer, or double clicking it.
- 2. Edit the time-code on the top left side of the Viewer, under the Video tab.
- 3. Generally you will want to make it longer than it needs to be, then clip off the excess using the razor tool.
Exporting final video for review and approval
Preparing your video for a clean export
Before exporting your final video, you should perform the action to Render All. Any track that has been altered with Color Correction, opacity editing or any effects will require re-rendering, as well as all fades and dissolves.
Depending on the amount of alterations made to the video tracks, one song can take anywhere from 10 to 20 minutes to render.
- - Choose the menu commands Sequence –> Render All –> Both.
Once rendering is complete, you are ready to export your video.
- - With your selected song sequence in the Timeline, or highlighted in the Browser window, choose the menu commands File –> Export –> QuickTime Movie and use the default settings.
- - Title your new video using the Song Title, which should auto fill from the sequence name, and save it into the appropriate song folder.

Convert Video File to New Format With MPEG Streamclip
This next process will convert and compress your video for upload to YouTube. This process could be done when exporting your video from Final Cut, however it greatly increases the export time, and is prone to errors. The process using MPEG Streamclip for final conversion has been found to be the quickest and most time-saving.
- Open the application MPEG Streamclip.

- Drag one of your newly created videos for YouTube into the MPEG Streamclip viewer.
- From the menus, select: File -> Export to MPEG-4
- Click on the Presets... button and choose KDHX: YouTube Comp, then click Load.
- The Movie Exporter window should look like this:

- - Click on Make M4, then locate the appropriate project and song folder.
- - Save the new file using the same title, and append YTC to the end of the filename, indicated that it is "YouTube Compressed."
- ex. 1. Feeling Groovy YTC
Repeat this process for each new video for YouTube that you have created.
NOTE: The export process will usually take between five and ten minutes per video.
Seeking Approval from a Peer Producer
Prior to uploading or publishing your video, a "second set of eyes" should review your video for potential problems.
The types of things that the reviewer should be watching for are;
- - extra black space at the beginning or end of the video and proper usage of KDHX bug.
- - non-performing members in the background, i.e., Audio Engineer, photographer, band entourage, etc. (this includes window reflections of same)
- - shots of band members looking bored or un-engaged
- - excessively short or long crossfades
- - bleedthrough of other tracks on crossfades
- - video glitches
- - confusing editing choices, i.e., "why do I hear an electric guitar playing a solo, but I can't see it?"
Each A/V workstation has a folder on the desktop linking to the REVIEW ME folder on the production server volume.
- - Double click on this folder to attach to the server and to view the folder's contents.
- - Move a copy of your YTC file to this folder.
Once your video(s) is in the REVIEW ME folder, find the Basecamp milestone for this session and make note that you are seeking approval to publish. Make sure that all of the Video Producers are copied in, as well as Andy and Valerie. This is accomplished by placing checkmarks by their names in the Basecamp message.
- “Report the Wart"
- In your Basecamp notes, you should "report the warts," which means to identify anything in your video that may be perceived as an error, or as not being ideal. The note should contain any information about the edit that would be useful for the person reviewing it; i.e., "I would like to show a wide shot at the beginning, but two of the musicians were looking at their cell phones."
- Including this information in your notes will help the reviewer avoid un-necessary instructions or feedback.
When the video has been approved, you will be instructed to upload your video to KDHX's YouTube channel. The reviewer will delete the copy of your YTC video from the REVIEW ME folder.
Publishing
Logging into YouTube
- Go to Youtube and log in to the KDHX account. This information can be obtained from Andy or another Video Producer.
- Be discreet with this password. If you are on a public computer, remember to log out after you are finished!
- Once you are logged in, make sure that you are logged into the correct account, which is the account with 4K subscribers. (see example below)

Video file upload
- Click on the Upload button in the upper right corner of the YouTube window.
- Find the video you want to upload on your hard drive, drag and drop it in this window.

-Fill in the title field completely, using the name of the band/act, the text "Live at KDHX" and the date in short format.
- ex. Fanfarlo Live at KDHX 4/5/14

The description field will be pre-filled with a template detailing how the finished information should be formatted. Fill in what you can of this information, but if there is something you do not know, leave the template item with the brackets. This happens most often with [LINK], [DJ] and [SHOW]. These items will be corrected in final review, before the video is made public.
- Five tags will pre-fill from the template. Do not worry about adding any tags for your video. Our tags are strictly formatted and will be added in final review.
- Privacy should be set to Private.
- When you are done filling in information for this video, click on the button that says Done.
- If you have other videos to upload, you can queue them up by using the Add More Files button on the lower right corner of the YouTube window.
- Log out of YouTube.
When you have finished uploading new videos, find the applicable Basecamp milestone and make note that the videos are now on YouTube, ready for final review. Be sure that Andy and Valerie are copied in on this request.
Final review process
- Andy or Valerie will review each video, looking for any problems that may have been missed. Comments may be provided; sometimes a video may be rejected for use or sent for repair. All of these communications are handled via Basecamp.
- Reviewer will double check band and song names for accuracy, fill in any missing information from the video description, and add tags for each video.
- Once reviewed, the videos are compiled into YouTube playlists, published and appended to a KDHX.org article about the live session. Notification of publication will be sent via Basecamp and seeded to Facebook.