Lighting in the LJW Studios
Contents
Overview
The LJW Studios at KDHX are positioned on the south side of the building, with all natural light being provided from due south as well.
The light in this room changes continually with the hour of the day and the season, not to mention the weather conditions at the time of the shoot.
This document will provide photographs that illustrate some of the lighting issues that you will be dealing with during a video shoot, proven angles that work well in different lighting situations and other obstacles you may encounter shooting in the LJW studio.
Windows to outside
The LJW Studio has three large windows located on the south wall, each with a blackout shade and pulley.

If the camera is pointed in the direction of one of these windows, you can see that the lens is using all of it's power to focus on what is located outside, and leaves the objects in the room very dark and shadowy.
One of the most basic rules of photography is for the sun to be behind the photographer, not behind the subject.

This photograph was taken less than one minute later, and from the southwest corner. By eliminating the windows from the view, the lighting and coloration is much improved.
Partial windows in shot
Even including just a partial bit of the window in the shot drastically reduces clarity, coloration and natural flesh tones.
 VERSUS
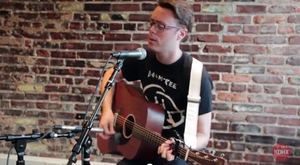


Notice that with the window in the shot, you begin to see shadows on the subject's face, dis-coloration and grainy image quality.
The photo on the right with no window has a clear image with realistic color and flesh tones, and is well lit.
Placing performers in front of outside windows
Here are some examples of badly lit subjects and color, due to placing the performers in front of these windows, or including the windows in a shot. (Clicking on these images will display larger versions for closer study.)


Drummer in the corner and the "hot-spot"
Due to the layout of the studio, and the proximity of the control booth, both audio engineers and drummers gravitate toward placing the drums in the southeast corner of the studio, which is located right in front of a window. This position receives the harshest daytime light, and often creates a "hot-box" of white glare that creates obstacles to obtaining a clear, well lit, naturally colored image.
Here are some examples of harsh light and the "hot-spot" hitting the southeast corner of the room. (Clicking on these images will display larger versions for closer study.)


Lounge doors and control room windows
Due to the limitations of wall space in LJW, a group of 3-4 people is about all that can be squeezed into the desired brick background.
For larger groups, the videographer will need to be creative in his placement, attempting to avoid the outside windows as described above, and dealing with some of the challenges that arise when placing subjects in front of the lounge's sliding glass doors or the control room windows.
The biggest issue with putting subjects in front of these windows is the possibility of people behind the glass getting into the shot.


Also, during certain times of the day, the glass surfaces can become reflective, and the harsh glare can be distracting and confusing for the viewer.


Closing the blind on the window inside of the lounge can help to cut down on this glare somewhat.
Night shoots, closed blinds and overhead lighting
Although night time, after dark shoots are rare, they can provide for a dramatic backdrop using the city lights.
Since there is no sunlight coming in through the outside windows, shooting against them as a backdrop does not pose the same problems as a shoot that takes place in the middle of the afternoon.
On the other hand, the overhead lighting system used in LJW is very yellow in nature and, if video is used raw, may produce either a yellow or green cast to the performers skin. Almost all video shot in LJW using overhead lighting as its main source will require Color Correction in post-production. (Adding red seems to help considerably.)
Closing the blinds during a night time shoot can exaggerate the yellow cast of the overhead lights.


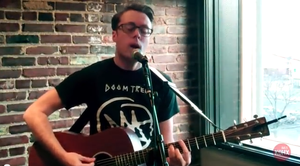
Examples of good shots
Close-ups
Tight close-ups using the DSLR can produce some beautiful and interesting footage for your videos.


Medium shots
Medium shots with the GoPros or DLSRs should contain a partial, yet substantial amount of the subject's body. Waist up and knees up are often considered "medium shots," however the difference between a "medium shot" and a "long shot" is often a grey area.


Long/Wide shots
A true "long" or "wide shot" is often used to establish the scene and its surroundings. For our purposes, that would likely mean a shot containing full views of as many band members as will fit, preferably all of them if possible.
In post-production editing, these shots become essential cut-aways, used when other cameras do not have desirable footage to use; i.e., people looking through windows, musician stepped out of frame, DSLR is out of focus, etc.


- Return to Video Production Process