Difference between revisions of "Talk:Consolidating Tracks and Exporting Files"
(→5. One track of audio) |
(→4. Make sure you are in SLIP mode) |
||
| Line 39: | Line 39: | ||
It should look something like this: | It should look something like this: | ||
| − | [[File:Moving_opening.png|200px]] | + | :[[File:Moving_opening.png|200px]] |
Listen to your audio to make sure that the transition sounds okay. When placed properly, you should not be able to tell that there are two different pieces of audio playing. Follow the same procedure for the outro of your piece, or any other parts that need to be consolidated. | Listen to your audio to make sure that the transition sounds okay. When placed properly, you should not be able to tell that there are two different pieces of audio playing. Follow the same procedure for the outro of your piece, or any other parts that need to be consolidated. | ||
Revision as of 21:42, 24 February 2015
Contents
Overview
Once your project is finished, you need to move it out of the ProTools environment so that it can be used elsewhere. There are a couple of different ways to do this and each method has its own purpose.
This section covers Consolidating Tracks and Exporting Files, which allows you to save individual regions from ProTools. This happens almost instantly, so it is ideal if you are working with a long project. If you're working with a shorter project with multiple tracks, Bouncing to Disk will likely be your best option.
Often times a project will contain more than one track (ex. voiceover, music beds, etc.)
In order to export this media from ProTools, these tracks need to be consolidated into one track. The export function will transfer one track and one track only. This process is a little tricky at first, but if you follow the steps below, you'll be a pro in no time.
1. Identify sections needing consolidation
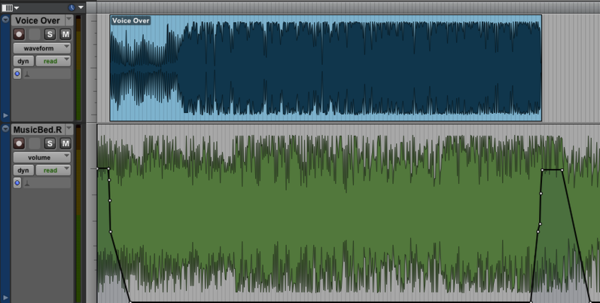
Let's use this project as an example:
You want to move as little audio as possible.
For this project, the music at the beginning and the end (located in the bottom green track), needs to be coupled with the voiceover in the top blue track. To do this, we will bounce small sections of the project and then bring those bounced pieces into the voiceover track to make one complete, single-track project.
2. Highlight your selection
Highlight the first section of audio that you want to bounce. Be sure to highlight all of the tracks that you want included.
3. Bounce the audio
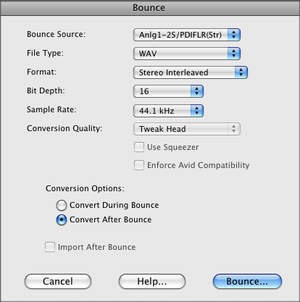
Go to File -> Bounce to... -> Disk. More information about the bouncing process can be found at Bouncing to Disk)
When given options about how you'd like the audio to save, the following settings are recommended:
Pay attention to where ProTools is saving that file and what you are naming it. You will need it again in a minute.
4. Make sure you are in SLIP mode
In ProTools, make sure that you're in SLIP mode, then hit the Delete key to remove the audio that you just bounced out.
Next, use Finder to find your new bounced file in and drag it into the empty space.
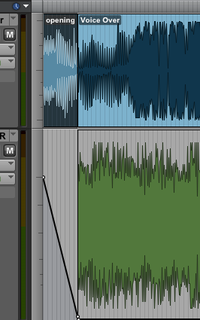
It should look something like this:
Listen to your audio to make sure that the transition sounds okay. When placed properly, you should not be able to tell that there are two different pieces of audio playing. Follow the same procedure for the outro of your piece, or any other parts that need to be consolidated.
It is easiest to work in SHUFFLE mode for the ending, so that your audio lines up perfectly.
5. One track of audio
Now that all of your audio is in one track you need to combine it into one region for Export.
Select all of the audio in the track that you are going to consolidate.
6. Consolidate Region
Once your audio is selected, go to Edit -> Consolidate Region and your audio will be combined into a single region.
7. Exporting
The tough part is done!
Now, all you need to do is export that same region from ProTools.
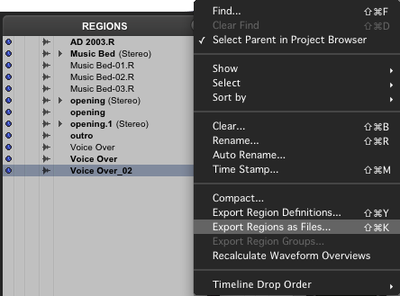
Use the hand tool to make sure that the desired region is selected. Then, find the REGIONS list on the right side of the window and click the downward arrow just to the right of REGIONS.
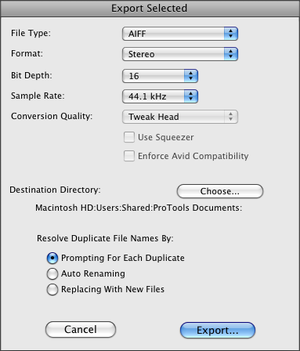
8. Export Selected
Make sure the settings are as follows:
9. Naming your file
Now you can name your file, choose the correct folder for saving and you're done!
