Difference between revisions of "Helpful Editing Tools and Tricks"
(→Crossfade) |
|||
| Line 1: | Line 1: | ||
| − | == Crossfade == | + | These tools will help you when you are [[Editing With ProTools]]. So will [[ProTools Icons and Tools]] |
| + | |||
| + | ==Crossfade== | ||
*This is helpful when a cut has been made too close and sounds somewhat garbled. To crossfade one section to another, use the SELECTOR tool to highlight the area that both sections meet. | *This is helpful when a cut has been made too close and sounds somewhat garbled. To crossfade one section to another, use the SELECTOR tool to highlight the area that both sections meet. | ||
| Line 11: | Line 13: | ||
*From here, you can adjust the weight of the fade by using the cursor to move the waveform forward or back. Then, click “OK.” | *From here, you can adjust the weight of the fade by using the cursor to move the waveform forward or back. Then, click “OK.” | ||
| − | == Time Compression/Expansion == | + | ==Time Compression/Expansion== |
This can be helpful when your recording exceeds the length that the recording should be. Say, for instance, you needed to record a 30 second underwriting spot but it ended up topping out at 34 seconds. To fix a situation like this, go to AudioSuite → Other → Time Compression Expansion. Then, change the “destination length” to what is desired and click on “process.” Be sure to listen to your piece after using this tool to make sure the pace still sounds natural and not too rushed. If it does sound too rushed, see what you can cut out. | This can be helpful when your recording exceeds the length that the recording should be. Say, for instance, you needed to record a 30 second underwriting spot but it ended up topping out at 34 seconds. To fix a situation like this, go to AudioSuite → Other → Time Compression Expansion. Then, change the “destination length” to what is desired and click on “process.” Be sure to listen to your piece after using this tool to make sure the pace still sounds natural and not too rushed. If it does sound too rushed, see what you can cut out. | ||
[[File:Time_compression.png]] | [[File:Time_compression.png]] | ||
| − | == Gain == | + | ==Gain== |
This can be used to change the volume of a selected portion of the waveform that is too loud or too quiet (this is especially helpful after re-recording sections). To change the gain of a certain section, use the “insertion” tool to highlight the area. Then, go to AudioSuite → Other → Gain. Adjust the Gain accordingly, preview, and click “process.” | This can be used to change the volume of a selected portion of the waveform that is too loud or too quiet (this is especially helpful after re-recording sections). To change the gain of a certain section, use the “insertion” tool to highlight the area. Then, go to AudioSuite → Other → Gain. Adjust the Gain accordingly, preview, and click “process.” | ||
[[File:Gain.png]] | [[File:Gain.png]] | ||
Revision as of 17:31, 5 November 2013
These tools will help you when you are Editing With ProTools. So will ProTools Icons and Tools
Crossfade
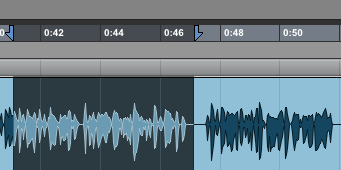
- This is helpful when a cut has been made too close and sounds somewhat garbled. To crossfade one section to another, use the SELECTOR tool to highlight the area that both sections meet.
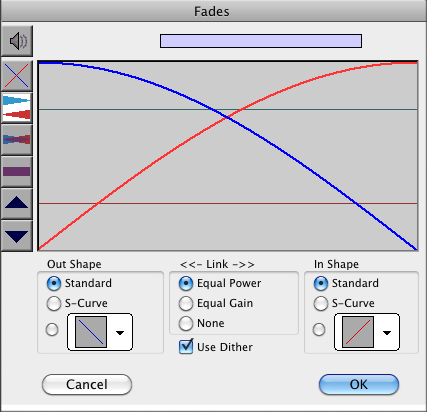
- Then, go to Edit → Fades → Create or use the keyboard shortcut Apple+F.
- From here, you can adjust the weight of the fade by using the cursor to move the waveform forward or back. Then, click “OK.”
Time Compression/Expansion
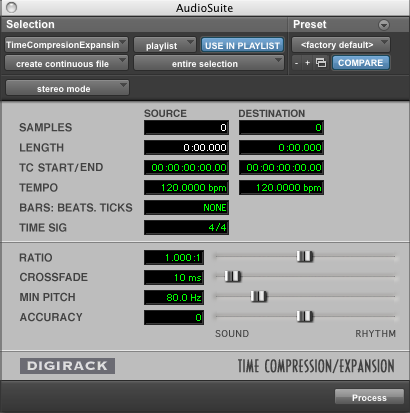
This can be helpful when your recording exceeds the length that the recording should be. Say, for instance, you needed to record a 30 second underwriting spot but it ended up topping out at 34 seconds. To fix a situation like this, go to AudioSuite → Other → Time Compression Expansion. Then, change the “destination length” to what is desired and click on “process.” Be sure to listen to your piece after using this tool to make sure the pace still sounds natural and not too rushed. If it does sound too rushed, see what you can cut out.
Gain
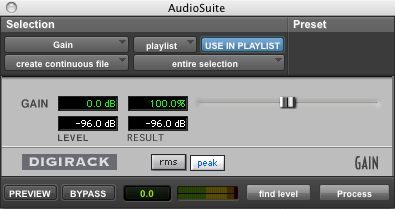
This can be used to change the volume of a selected portion of the waveform that is too loud or too quiet (this is especially helpful after re-recording sections). To change the gain of a certain section, use the “insertion” tool to highlight the area. Then, go to AudioSuite → Other → Gain. Adjust the Gain accordingly, preview, and click “process.”


