Difference between revisions of "Color correction and logo"
(→Adding the KDHX Logo Bug and Titles) |
(→Color correction) |
||
| Line 1: | Line 1: | ||
==Color correction== | ==Color correction== | ||
| − | + | Depending on camera settings used, you may need to do some color correction on your clips so that the footage matches in quality across all video footage. In most cases, the DSLR footage will have the best color and will be the one that you use as your "master" for hue correction. Good areas to use for color matching are the grey walls or a particularly colorful shirt or guitar. | |
| − | + | ||
| − | In most cases, the DSLR footage will have the best color and will be the one that you use as your "master" for hue correction. Good areas to use for color matching are the grey walls or a particularly colorful shirt or guitar. | + | |
''This short video will demonstrate a quick trick to make footage matches quickly and easily. '''[http://youtu.be/2hwMf8YIih4?t=13s Final Cut Pro and Express Tutorial: Color Correction Tip]''''' | ''This short video will demonstrate a quick trick to make footage matches quickly and easily. '''[http://youtu.be/2hwMf8YIih4?t=13s Final Cut Pro and Express Tutorial: Color Correction Tip]''''' | ||
Revision as of 18:13, 8 May 2018
Color correction
Depending on camera settings used, you may need to do some color correction on your clips so that the footage matches in quality across all video footage. In most cases, the DSLR footage will have the best color and will be the one that you use as your "master" for hue correction. Good areas to use for color matching are the grey walls or a particularly colorful shirt or guitar.
This short video will demonstrate a quick trick to make footage matches quickly and easily. Final Cut Pro and Express Tutorial: Color Correction Tip
Repeat for all of the clips that need correction. Use your eye and your good sense to tell when you think the color is matching between the different video tracks.
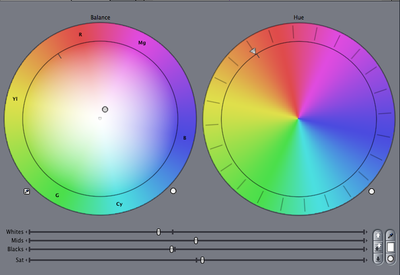
Color correction window (Visual)
Other adjustments that may help in color correction can be used to brighten or alter an image:
- - Whites: moving this slide to the left may help to dull bright whites from the outside windows.
- - Mids: in a heavily shadowed image, moving this slider to the right can help to bring detail out of the shadows.
- - Blacks: moving this slider to the left can help to sharpen image quality, while moving it to the right can help to bring out some hidden detail.
- - Sat: (color saturation) sliding the tab to the left will decrease the amount of color in your video, all the way to black and white if moved to the far left. Moving the slider to the right will increase the amount of color, and may help to improve image quality on washed on footage with too much light.
NOTE: Color correction settings are able to be copied and pasted to tracks across all of the songs in a session. Once one song has been color corrected, these filters can be copied to all of the tracks that come from the same camera.
Adding the KDHX Logo Bug
The KDHX logo “bug” is an additional transparent layer added over the top of your video footage, and should fade up simultaneously from black in the opening shot.
At the end of the video, apply a one to two second fade to black, followed by a one second fade on the bug. This provides the viewer with a moment to see our logo.
- - On each drive, there is a file called KDHX-logo-bug-2013.png. Copy this file into your project folder.
- - After importing it into Finale Cut Express, drag the file to the top track of your timeline, above all of the other video tracks.
The length of the bug can be changed by:
- 1. Dragging the file into the viewer, or double clicking it.
- 2. Edit the time-code on the top left side of the Viewer, under the Video tab.
- 3. Generally you will want to make it longer than it needs to be, then clip off the excess using the razor tool.
--> Return to Video <--

