Color correction and logo
Color correction
- Depending on camera settings used, you may need to do some color correction on your clips so that the footage matches in quality across all video footage.
- Probably the most important aspect of CC is getting skin tones right. Good areas to use for color matching are the grey walls or a particularly colorful shirt or guitar.
- In most cases, the DSLR footage will have the best color and will be the one that you use as your "master" for hue correction. Instead of color correcting all images to ideal, it can sometimes help to pick a central image from the group, where moving others toward central works better than moving all toward correct.
Begin Color Correction only after you've built a single multicam clip (click for instructions) for the entire session (3 or more songs, in sync, with draft or final audio on the lowest track).
Open the Multicam clip, and select the first clip from the first song clip, and click on monitoring angle to put it in the viewer.
Hide the Browser (button at top right), and choose to View Scopes in the Viewer's menu.

This video will demonstrate a basic CC workflow, starting with Exposure: Final Cut Pro X Color Correction
Recommended process:
1. Begin with Exposure
- view the image with Luma Waveform scopes
- set blacks and white within the 0 to 100 range for video black and white respectively
- use gamma (middle control to set overall exposure to taste (viewing image, not scopes)
- avoid using the main/global control for this process
2. Next, handle Color Balance
- view the image with RGB Parade
- again, we'll adjust using 1 and 100 as min/max, but in this case, use highlight control on a specific color to bring R G or B into correct range under 100, and the blacks control on a color to bring blacks above 0.
- after tweaking color levels, return to exposure and the luma waveform scope to re-adjust
3. Finish by using Saturation
- view the image in the vectorscope
- note the skin tone diagonal, and use Saturation view's midtones and global controls to adjust toward an ideal 1/3 mark from center
Repeat for all of the angles/clips for a particular song while viewing the muticam clip angles. Use your eye and your good sense to tell when you think the color is matching between the different video tracks.
Once you've balanced color for all angles on a particular song, you'll want to duplicate the CC setting for each clip of the same angle/shot throughout the session. This can be handled by:
1. copy/paste effect - select the Color Correction (or Color Board) in the Inspector, top right, then use COPY from the Edit Menu.

Select the new clip (this would typically be the 2nd of 3 or more clips form the same camera/angle needing the same treatment)
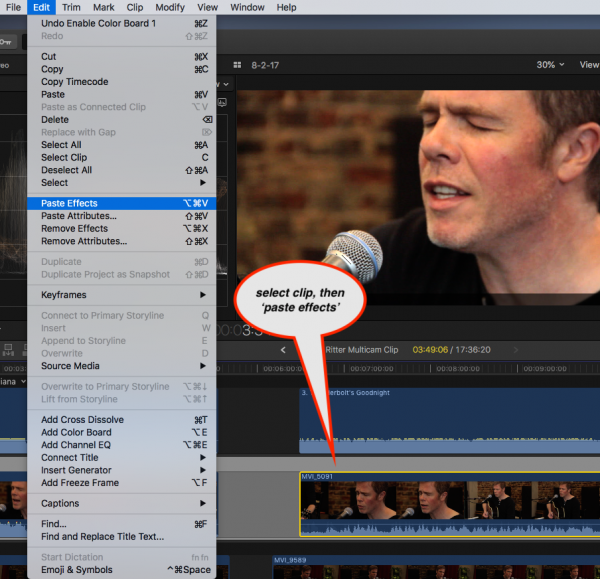

or 2. Save and apply effect via the Effects Browser (bottom right of inspector to save, top right of timeline)
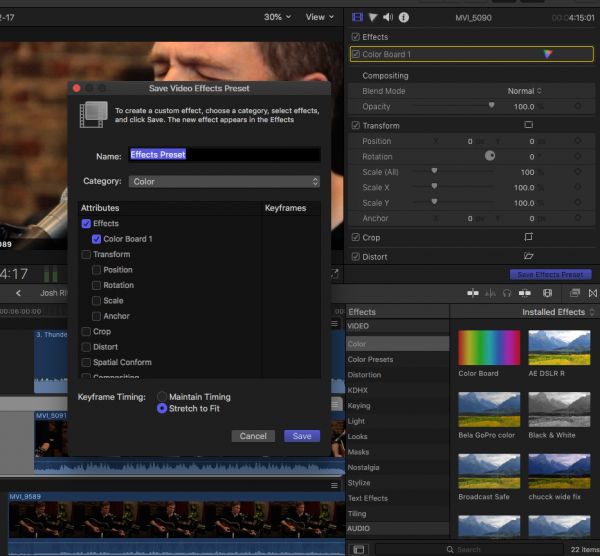

Drag saved effect onto any clip to apply it. (If you wish, select the clip first, and roll over desired effect to preview)
Adding the KDHX Logo Bug
The KDHX logo “bug” is an additional transparent layer added over the top of your video footage, and should fade up simultaneously from black in the opening shot.
At the end of the video, apply a one to two second fade to black, followed by a one second fade on the bug. This provides the viewer with a moment to see our logo.
- - On each drive, there is a file called KDHX-logo-bug-2013.png. Copy this file into your project folder.
- - After importing it into Finale Cut Express, drag the file to the top track of your timeline, above all of the other video tracks.
The length of the bug can be changed by:
- 1. Dragging the file into the viewer, or double clicking it.
- 2. Edit the time-code on the top left side of the Viewer, under the Video tab.
- 3. Generally you will want to make it longer than it needs to be, then clip off the excess using the razor tool.
--> Return to Video <--