Bouncing to Disk
Once your project is finished, you need to get it out of ProTools to use elsewhere. There are a couple of different ways to do this, and each method has its own purpose. This section covers bouncing to disk, which exports a project in real time. For this reason, this method works best for short pieces, and provides you with a final chance to listen to your entire piece as its being bounced. If you're working with a longer piece, bouncing may not be the best or most time efficient method. Instead, you'd want to try Consolidating Tracks and Exporting Files.
1. When you're ready to bounce, first (using the selector tool ![]() ) highlight from the end of you piece to 00:00:00 on the timeline. This tells Pro Tools where to start and stop the bounce. Be sure to un-mute all tracks you want to bounce and mute any unwanted tracks! Also, double check that you have a half second of silence at the beginning.
) highlight from the end of you piece to 00:00:00 on the timeline. This tells Pro Tools where to start and stop the bounce. Be sure to un-mute all tracks you want to bounce and mute any unwanted tracks! Also, double check that you have a half second of silence at the beginning.
2. Once you've selected your desired audio, go to the File menu -> Bounce to -> Disk... or hit Option+Apple+B
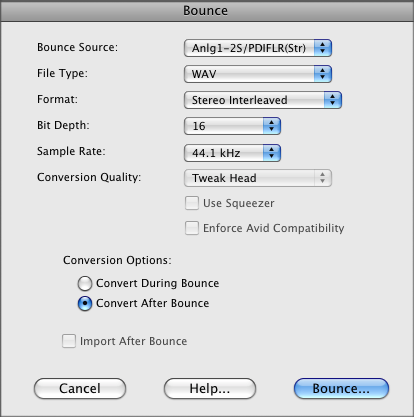
3. You'll then be prompted to choose how you'd like the audio formatted. Make sure your settings match the following:
4. When you're ready, hit "Bounce" and choose where you'd like your bounced audio file saved. You can also name it at this time.
5. Hit save, and your audio will begin bouncing in real time. Once again, this is a perfect opportunity to give your project one final listen to make sure it sounds great start to finish. When this process is complete, your project is ready to be used wherever you'd like it!
