Difference between revisions of "Video Production"
(→Shooting a Solo Act) |
(→Big no-no's) |
||
| (3 intermediate revisions by the same user not shown) | |||
| Line 66: | Line 66: | ||
Rather than placing the cameras all at medium shots around the artist, have one focused on the guitar or instrument, one on a medium shot of their upper body (never cut off a shot at the neck!), and also a medium shot to combine all of the elements. | Rather than placing the cameras all at medium shots around the artist, have one focused on the guitar or instrument, one on a medium shot of their upper body (never cut off a shot at the neck!), and also a medium shot to combine all of the elements. | ||
| − | '''Close-up of hands on instrument. ( | + | '''Close-up of hands on instrument. (GoPro)''' |
:[[File:solo_shooting_close_up.jpg|400px]] | :[[File:solo_shooting_close_up.jpg|400px]] | ||
| Line 72: | Line 72: | ||
:[[File:solo_shooting_vocalist.jpg|400px]] | :[[File:solo_shooting_vocalist.jpg|400px]] | ||
| − | '''Medium shot. ( | + | '''Medium shot. (DSLR2 or GoPro)''' |
:[[File:solo_shooting_medium.jpg|400px]] | :[[File:solo_shooting_medium.jpg|400px]] | ||
| Line 83: | Line 83: | ||
:[[File:shooting_bad_background.jpg|400px]] [[File:shooting_bad_background2.png|400px]] | :[[File:shooting_bad_background.jpg|400px]] [[File:shooting_bad_background2.png|400px]] | ||
| − | ''' | + | '''camera in the shot''' |
:[[File:Flipcaminshot.png|400px]] | :[[File:Flipcaminshot.png|400px]] | ||
| Line 95: | Line 95: | ||
---- | ---- | ||
| − | |||
[[Category:Video]] | [[Category:Video]] | ||
| + | [[Category:Production]] | ||
Latest revision as of 23:58, 20 April 2018
Production
Important: Due to the location and shape of the LJW studio, photographers and videographers will at times have issues with the lighting in the room.
Please review the document Lighting in the LJW Studios before your first video shoot.
Camera positioning
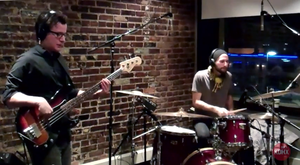
Use between three and five cameras to cover all players.
These shots are priorities:
- 1. One camera locked down on the lead vocalist (medium shot).

- 2. One camera locked down on the drummer/rhythm section
- (medium shot of drummer, or a medium two shot with guitarist or bassist).
 OR
OR 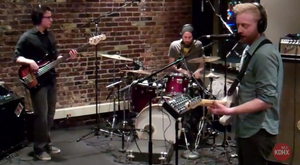


- 3. One moving camera (DSLR) getting medium and close-up shots of the person of action (a singer or soloist).

Note: KDHX would like for our talent to feel comfortable and at home in our studio, so the less "on camera" they feel, the better the performance.
Consider lessening the impact of using so many cameras with these tips:
- - Use small tripods for the GoPros cameras and place them strategically for mediums and wides and two-shots so that they are less conspicuous to the performer(s).
- - Try to limit the camera crew to one or two persons in the room as DSLR operators. If a second videographer is available, they may be also designated to checking and adjusting locked down GoPros cameras between songs.
Pointers
- For roving cameras like the DSLR, stick on each shot at least 10 seconds. (If you know anything about music, hold a shot for at least 8-16 bars of music.)
- Pay attention to the composition of your image. Framing your shot using the Rule of Thirds makes for a more interesting image, moreso than a perfectly centered subject.

- Make note of the elements within the margins of the frame. Are there mic stands, camera stands, doors, chairs, cables, etc. that could clutter edges of the shot or are in the background? If so, readjust or try to reduce background clutter from the room. Also, look for mic stands in front of the performers faces, as they will likely be a distraction as well.
- Move empty cases and coats to the lounge.
- When shooting, try not to violate the personal space of the performers. Use the zoom on the DSLR to get up close and personal, while maintaining distance from the performer(s).
- Be careful not to step into the view of the fixed cameras during the performances, or to place a camera in the view line of another camera.
- Try to re-adjust the locked down camera shots after each song, as the band may have slightly shifted positions. Re-positioning these cameras slightly different for each song will allow for multiple perspectives, and will make for a more interesting series of videos.
- When shooting with the GoPros:
- avoid 4k and Wide shots that create a fish eye effect. Stick with 2.7k and medium framing settings for footage that will better couple with the DSLRs.
- Frame your subject with a liberal approach when using 2.7k or 4k, as you will have extra image available to crop without degrading within your 1080p canvas.
- Use ProTune to minimize glare. This requires the application of a LUT in post to restore the quality. (More on the use of LUTs here)
Shooting a Solo Act
To view a model example of a solo session, refer to Chris Mills by Ed Kleinberg
When shooting a soloist, be careful to not break the 180-Degree rule, which is a basic guideline for video and film making that states:
- "a character or other element (in our case the "other element" will usually be an instrument) in the same scene should always have the same left/right relationship to each other."
Please watch this short video explaining the concept simply and showing examples: Moviemaking Techniques180 Degree Rule
Rather than placing the cameras all at medium shots around the artist, have one focused on the guitar or instrument, one on a medium shot of their upper body (never cut off a shot at the neck!), and also a medium shot to combine all of the elements.
Close-up of hands on instrument. (GoPro)

Close-up on performers face, aka the "beauty" shot. (DSLR)

Medium shot. (DSLR2 or GoPro)

Big no-no's
People watching from windows


camera in the shot

Open doors and blinds

Remember: A consistent background or "scene" is very important!