Talk:ADAT Data Archiving Process
Contents
Overview
Live performances at KDHX are recorded to an ADAT machine manufactured by Alesis. All of the data on the ADAT drives must be transferred to a hard drive, copied into a ProTools session and burned to a DVD for archival purposes. This ensures two things: that KDHX always has a hard copy of the live performance data and that the ADAT drives don't fill up.
Moving Data from Alesis ADAT to a KDHX Firewire hard drive
You'll need the following supplies for this process:
- ADAT Hard Drive 1, 2 or 3 - use whichever one contains the data needing to be archived.
- the external hard drive labeled ADAT Data.
- the Fireport adapter for ADAT drives.
- a firewire cord for connecting the two drives.
Setting Up the Hard Drives
In order to move data from one storage device to another, the devices must be chained in parallel.
Here are instructions for setting up the hard drives:
- Ensure that both hard drives are turned OFF. The power switch for the external hard drive is on the back of the unit and is labelled On/Off. The switch for the ADAT drive is on the back of the adapter, and also labelled On/Off.
- Plug the ADAT drive into the Fireport adapter.
- Both the external hard drive and the ADAT drive need power supplies. There will be cords for both on the desk, double-check that both drives are OFF and plug both of them in.
- Plug the FireWire cord from the computer into the back of the external hard drive. This is very important - the external hard drive must be the hub between the computer and the ADAT Fireport adapter.
- Take a FireWire cable and plug it into the unused port on the external hard drive, connecting the other end to the ADAT Fireport adapter.
There should now be:
- - an external hard drive connected using FireWire to the computer and also to the ADAT Fireport adaptor.
- - Both should have their power supplies plugged in.
- - The ADAT drive should be plugged into the ADAT Fireport adapter.
Setting Up the Mac
Next, it's time to set up the Mac so that it can read the information from the ADAT drive. This step is tricky, but incredibly important. It's a necessary workaround due to a glitch between this version of Apple's operating system and Alesis' software. It does work though, so it's important to follow the instructions very carefully at this point.
- Turn on both the drives. The on/off switches are on the backs of the drives.
- Launch the Alesis software. Its the icon on the dock labeled adat FST.
- Once the software is launched, the Alesis FST Connect window will appear.
- In the upper right hand corner of the window is a box labeled Export to Directory, and to its right a button labeled Choose.
- This process selects the correct folder for the exported data.
- Click the Choose button, and select KDHX drive #3, followed by the ADAT backup folder.
- Within this folder there will be three more folders labeled ADAT backup HD1, ADAT backup HD2 and ADAT backup HD3.
- Select the appropriate folder for the ADAT drive that you are backing up.
- When completed, exit the program.
- Once closed, relaunch it and verify that the Export to Directory window still shows the folder that you just selected. If it does, the files are ready for export.


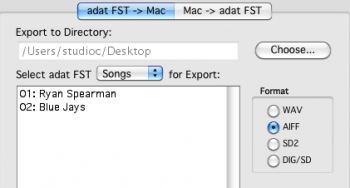
Exporting the Files
- Click on the files that you want to export; they are listed underneath the Export to Directory window.
- Highlight the file you want to move and click the Export button to the right. Be patient, this step will take some time.
- Once completed, verify that the files are in the correct folder by going to the Finder and taking a look.
- The files will be listed as .aif files and are now ready to be imported into Pro Tools.


Using ProTools and Toast to Archive ADAT Data
The data is now off of the ADAT drive and happily living on the KDHX external hard drive. The data now needs to be imported into ProTools, verified and burned to a DVD in data format.
Setting Up ProTools Session
- Click the ProTools icon to launch the program.
- Open a new project and select KDHX drive #3, the ADAT backup data and then the appropriate ADAT drive that corresponds to where your data came from.
- The title of the project should be the artist or band's name and the date they performed.
- -ex. Ryan Spearman 6-18-11
- - When entering the date, make sure to use hyphens. ProTools does not like slashes.
- ProTools will now build the file and create an empty edit window. Go to the Finder and locate the .aif files.
- Now, just click and drag these files into the Pro Tools edit window. The task manager will display a progress bar as the audio waveforms are being built.

Verifying Songs
Once Pro Tools has completed building the audio tracks, cross-reference all of the songs with Soundcloud.
Verify that each song is the same as the Soundcloud version. You don't have to listen to the whole song, but the entire session must be double-checked to make sure that data did not get lost.
Remember - this is the final archive of the session, so you must be 100% certain that the entire session has been saved.
Finding and Deleting Empty Tracks
After the audio is verified, double-click on the Zoom tool using the magnifying glass icon in the top left portion of the screen.
.png)
By double-clicking on the tracks, the whole session will be in view in the edit window. Now the distinction can be made between empty tracks and tracks with only one or two sounds on them.
An empty track looks like this:

There is not an audio waveform on this track. If uncertain about whether or not there is audio, there are two steps to take.
- Option 1: Enlarge the audio waveforms using the audio zoom tool, located in the upper left corner of Pro Tools.

- Close-up

- Close-up

- Clicking the arrow at the top of the button will make the audio waveforms larger, while the bottom arrow will make them smaller.
- Option 2: Double-check that there is no audio by soloing the track and listening to any section where there may be audio.
- Some tracks will have faint audio, possibly due to the DJ's microphone or an effect used by the artist during the session. Make sure that these do not get deleted.
- An example of what faint audio looks like:

- As you can see, there is very faint audio on this track.

- If there are blank tracks, and you are positive that they are blank, they need to be deleted. This cuts down on the size of the file and is very important for conserving space.
Confirming Data and Burning Final Data DVD
Double-checking that everything was done correctly up to this point is very important. As mentioned before, this is the final archival copy of the session, and it must be complete and perfect.
In the Finder window, there should be one folder containing the artist's name and date of performance. Inside this folder should be a ProTools session that has been verified for accuracy, and edited so that there are no blank tracks. The Audio Files folder should contain all of the .aif files originally taken off the ADAT.

Once it's confirmed that everything is correct, the final data DVD is ready to be burned.
It's time to burn a data disk of the session. Open Toast Titanium. The button is on the dock, and it looks like a toaster.

Once Toast is open, look to the upper left of the window and select the Data icon. From there, select the option for Mac and PC.

Now just click and drag the artist's file folder from the Finder into Toast. The whole folder should appear in the middle window.

If it's a small file, less than 700 MB, use a CD to burn it. The majority of the time, a DVD will be used. The size of the file, as well as the format of the disk can be viewed and changed at the bottom of the toast menu. Look at the picture of the Toast window above. At the bottom is a green toolbar with a small window next to it that says DVD. This is where the format can be changed. The toolbar shows how much space the file will take up on the given format.
If the file is over 4.4. GB, it will need to be split into two folders, and burned onto two disks.
Go ahead and insert the disk, click the big red button, and then label the DVD with the artist's name, date of performance and ADAT. Place the finished DVD's in a CD folder, write artist's name and performance date on the folder tab, and archive by date in the ADAT archiving drawers in Studio C.