Difference between revisions of "In Studio Video Capture Process - Using the DSLR"
From KDHX Production
(→Post production) |
|||
| Line 45: | Line 45: | ||
== Post production == | == Post production == | ||
| − | |||
| − | |||
| − | |||
| − | |||
| − | |||
| − | |||
| − | |||
| − | |||
| − | |||
*Finishing up | *Finishing up | ||
Revision as of 19:45, 1 September 2014
Setting up the DSLR
DO NOT use the lens to hold the camera. Always put the strap around your head, or wrist when holding the camera.
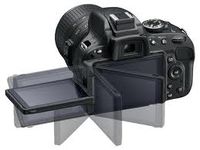
1. The viewing screen can be used flipped out, flipped over, used at an angle or returned to the back of the camera facing outward.
2. The Exposure control dial should be set to the Video Camera Icon. (click on the photo for a larger view)
3. Formatting the SD card: (Click this link for a short YouTube tutorial - Formatting an SD card)
- - Press the Play button, a blue triangle icon to the lower right of the screen.
- - The screen should display the message "No image."'
- - If there are still files on the card, make sure that they have been downloaded to the current working drive. If they have not, then please transfer them before formatting the card. If they have been transferred, proceed with formatting the card.
4. Make sure that these settings are turned on:
- - AWB (Auto white balance)
- - 720/60 (set at 720/60 fps (frames per second)
5. Tripod mounting plates should be on the camera(s), with the small nut facing towards the lens.
- - Lock down the tripod tilt and tighten the handles. Set up the camera on the tripod making sure that mount locks. Start with locking mechanism open, feed plate into the side opposite the locking mechanism under top and bottom guides. Press firmly onto lock, and it should snap shut. DO NOT leave camera on tripod without being sure it is securely mounted with all adjustments tightened.
- Place the tripod in a centralized location. This will depend on number of members in the band, but the best spot will probably be in front of the glass.
- Use the tripod central height adjustment to place the camera at the band’s eye level. Avoid shooting from below (up their nose!), and from above (looks like surveillance footage).
Rules of good DSLR shooting technique
- - Make each camera angle unique and avoid mirroring the same angle as the DSLR shots.
- - Use the Flip cameras to cover wide shots, profiles and shots that include multiple band members. If possible, use one flip camera to capture a wide shot of the entire band.
- - When shooting, keep an eye on what is happening outside of the camera's view. Look around and observe what is happening in the performance. Is there a guitar solo coming up? The idea of "show me what I'm hearing" should be your guide for DSLR closeups. You can request a headphone feed of the full mix from the audio engineer to better hear the action.
- -At all times you should have one hand on the tripod handle and one hand focusing ring of the lens.
- - While shooting, you must constantly check to make sure that the camera is in focus. A tiny difference in the focus can dictate the difference between a usable and an unusable piece of footage.
- - The general rule for shooting close ups is to set up the shot and stay on to it for as long as you can - NEVER less than 5 seconds. Keep in mind that not leaving enough time on a shot will result in that shot being unusable.
- - The bulk of your DSLR footage will focus on lead vocals and instrumental solos, but try to get a decent medium shot of each member in the band during each song.
- - Avoid framing subjects at their joints, i.e., shoulders, at the waist, at the knees.
- - DSLR close ups should be used to add emotion and character to a session, not used as the main image source for the finished video.
Post production
- Finishing up
- Place the card back into the camera, and turn the camera on
- Format the Card
- Press play - blue triangle to the lower right of the screen.
- Press Menu
- Use the keypad to navigate to the first settings screen
- It is the first yellow screen with a wrench
- use the wheel or keypad to scroll down to "format"
- Press the Set button
- A dialogue will come up asking you to format the card, press the right keypad to navigate to "OK”
- Press Set to confirm
- Very Important: DO NOT TURN OFF THE CAMERA while it is formatting
- Turn off the Camera
- Remove the Battery and place on charger (in Studio C)
- Flip LCD screen back to facing the camera
- Place camera back in bag and put away, leaving the lens and tripod mounting plate attached.

