Difference between revisions of "How to use Lighting Console"
| Line 1: | Line 1: | ||
| − | This is an introduction and brief overview | + | ==Overview== |
| + | This is an introduction and a brief overview covering the operation of the '''ETC Smartfade ML Lighting console''', located in '''[http://www.thestagestl.com/ The Stage]'''. | ||
| + | |||
| + | This page is intended for production personnel and volunteers who are in need of some instruction on how to operating the console. For access to advanced processes and information, please refer to the lighting console manual, which is located with the other gear documentation in the sound booth. | ||
==Operating the console== | ==Operating the console== | ||
| + | ===Turning On/Off the light console=== | ||
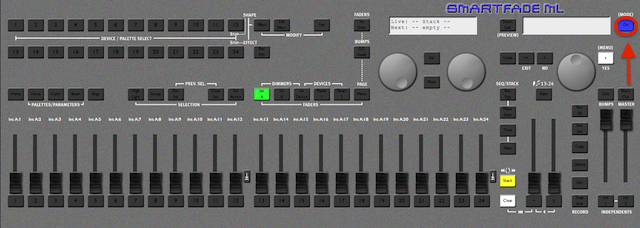
| − | + | :To turn '''ON''' the light console, locate the power button at the top right of the light console and press it. It will take a few moments for the console to boot up. Once the boot up process is finished the console will be available for use. | |
| + | :[[File:EtcOn.jpg]] | ||
| − | + | :To turn '''OFF''' the console, locate the power button at the top right of the light console and press it. You will then be prompted to '''CONFIRM''' or '''ABORT'''. | |
| + | ::- To '''ABORT''', select the '''NO''' button just below the text '''ABORT''' in the LCD window. It will be labeled with a '''NO''' underneath the button. | ||
| + | ::- To '''CONFIRM''' select the '''YES''' button, which is also the '''MENU''' button, just below the text '''CONFIRM''' in the LCD window. | ||
| − | + | ::[[File:EtcOff.jpg]] | |
| − | + | ||
| − | + | ||
| − | [[File:EtcOff.jpg]] | + | |
| − | + | ||
| − | ===Using saved memories | + | :If you still have lights on after shutting down the console, proceed to [[Troubleshooting ETC Light Console]]. |
| − | + | ||
| − | + | ---- | |
| − | + | ||
| − | [[File:EtcMem.jpg]] | + | ===Using saved memories=== |
| − | + | To access and use saved memories on the light console, first make sure that the light console is ON. | |
| + | |||
| + | There are 12 banks of memories on the SmartFadeML light console, with each bank containing 12 more additional memories. | ||
| + | |||
| + | '''To access a memory bank''' on the light console: | ||
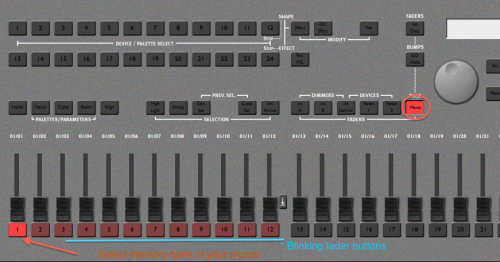
| + | #Press and hold the '''MEMS''' button. The fader buttons should start blinking. | ||
| + | #Select the memory bank you want to use. | ||
| + | #While holding down the '''MEMS''' button, notice that one of the flashing fader buttons is brighter than the others. That button is the currently selected memory bank. | ||
| + | #if you want to access a different memory bank, press a different fader button. Beginning users of the console should only use Memory Bank number one. | ||
| + | #:[[File:EtcMem.jpg|500px]] | ||
| + | #To use a light scene that is saved within a memory bank, slide the appropriate fader up (1-24) to the desired intensity. | ||
| + | ---- | ||
===Programming memories=== | ===Programming memories=== | ||
| − | + | Programming the light console is for '''advanced users only'''. If you are an advanced user, please DO NOT overwrite any memories currently saved on the light console. If there are not any available memory banks, notify the facility manager to assist. | |
| − | + | ||
| − | + | There are a handful of ways to program the memories on the ETC SmartFadeML Light Console. The current recommendation is to '''use the REC SEL method''', not the REC ALL method. During a live show, the lights will often change to unwanted colors and do things that are not logical in the REC ALL mode. | |
| − | + | ||
| − | + | #Press the '''DEVICE SELECT''' button, located in the center of the console | |
| − | + | #Press the '''PARAM 1''' button, located in the button bank to the left of DEVICE SELECT. | |
| − | + | #When both buttons are lit, you can start selecting fixtures that you would like to program. | |
| − | + | #:'''Note:''' There are three rows of light fixtures with four lights per row and there are also two moving head lights. Your main focus will the LED fixtures; only facility managers and trained users able to use the moving head lights. | |
| − | + | #'''Choose the fixtures''' you would like to program (9-20) by selecting them. | |
| − | + | #'''Slide the fader''' number up one notch in intensity and press the '''COLOR''' button located above that same fader. | |
| − | + | #'''Select a color'''. | |
| + | #The selected light fixtures should change to the chosen color. If not, repeat the above steps. | ||
| + | #If you are satisfied with the color, deselect those fixtures and choose another set of fixtures to program, if that is your intention. | ||
| + | #If you only want to program a single choice color and fixture, '''SAVE''' the memory. | ||
| + | #Press the '''RECORD SEL''' button, located by cross faders, and save the memory to its proper location. | ||
| + | #All of the fader buttons should start '''flashing red'''. | ||
| + | #Press and hold down the '''MEMS''' button to verify which empty memory bank you are using to save. Available spots for memories will be indicated with a brightly lit red fader button. If all of the fader buttons are dimly lit, move to another memory bank. | ||
| + | |||
| + | '''NEVER save a memory over an already existing fader memory!''' | ||
[[Category:Production]] | [[Category:Production]] | ||
| − | [[Category: | + | [[Category:The Stage]] |
Revision as of 21:12, 13 March 2015
Contents
Overview
This is an introduction and a brief overview covering the operation of the ETC Smartfade ML Lighting console, located in The Stage.
This page is intended for production personnel and volunteers who are in need of some instruction on how to operating the console. For access to advanced processes and information, please refer to the lighting console manual, which is located with the other gear documentation in the sound booth.
Operating the console
Turning On/Off the light console
- To turn ON the light console, locate the power button at the top right of the light console and press it. It will take a few moments for the console to boot up. Once the boot up process is finished the console will be available for use.
- To turn OFF the console, locate the power button at the top right of the light console and press it. You will then be prompted to CONFIRM or ABORT.
- - To ABORT, select the NO button just below the text ABORT in the LCD window. It will be labeled with a NO underneath the button.
- - To CONFIRM select the YES button, which is also the MENU button, just below the text CONFIRM in the LCD window.
- If you still have lights on after shutting down the console, proceed to Troubleshooting ETC Light Console.
Using saved memories
To access and use saved memories on the light console, first make sure that the light console is ON.
There are 12 banks of memories on the SmartFadeML light console, with each bank containing 12 more additional memories.
To access a memory bank on the light console:
- Press and hold the MEMS button. The fader buttons should start blinking.
- Select the memory bank you want to use.
- While holding down the MEMS button, notice that one of the flashing fader buttons is brighter than the others. That button is the currently selected memory bank.
- if you want to access a different memory bank, press a different fader button. Beginning users of the console should only use Memory Bank number one.
- To use a light scene that is saved within a memory bank, slide the appropriate fader up (1-24) to the desired intensity.
Programming memories
Programming the light console is for advanced users only. If you are an advanced user, please DO NOT overwrite any memories currently saved on the light console. If there are not any available memory banks, notify the facility manager to assist.
There are a handful of ways to program the memories on the ETC SmartFadeML Light Console. The current recommendation is to use the REC SEL method, not the REC ALL method. During a live show, the lights will often change to unwanted colors and do things that are not logical in the REC ALL mode.
- Press the DEVICE SELECT button, located in the center of the console
- Press the PARAM 1 button, located in the button bank to the left of DEVICE SELECT.
- When both buttons are lit, you can start selecting fixtures that you would like to program.
- Note: There are three rows of light fixtures with four lights per row and there are also two moving head lights. Your main focus will the LED fixtures; only facility managers and trained users able to use the moving head lights.
- Choose the fixtures you would like to program (9-20) by selecting them.
- Slide the fader number up one notch in intensity and press the COLOR button located above that same fader.
- Select a color.
- The selected light fixtures should change to the chosen color. If not, repeat the above steps.
- If you are satisfied with the color, deselect those fixtures and choose another set of fixtures to program, if that is your intention.
- If you only want to program a single choice color and fixture, SAVE the memory.
- Press the RECORD SEL button, located by cross faders, and save the memory to its proper location.
- All of the fader buttons should start flashing red.
- Press and hold down the MEMS button to verify which empty memory bank you are using to save. Available spots for memories will be indicated with a brightly lit red fader button. If all of the fader buttons are dimly lit, move to another memory bank.
NEVER save a memory over an already existing fader memory!


