Difference between revisions of "Category:Editing Live Performance using razorblade"
(Created page with "Ideas for teaching trainees on editing with the razorblade. This wiki assume prior knowledge of using final cut opacity settings and an understanding of syncing the good audio w...") |
|||
| Line 1: | Line 1: | ||
Ideas for teaching trainees on editing with the razorblade. | Ideas for teaching trainees on editing with the razorblade. | ||
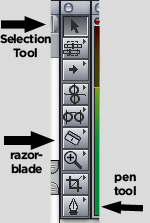
| − | This wiki assume prior knowledge of using final cut opacity settings and an understanding of syncing the good audio with the video. | + | This wiki assume prior knowledge of using final cut pent tool/opacity settings and an understanding of syncing the good audio with the video. |
| + | |||
[[File:Toolbarexplained.jpg]] | [[File:Toolbarexplained.jpg]] | ||
| Line 14: | Line 15: | ||
[[File:Cutcliploweropacity.png]] | [[File:Cutcliploweropacity.png]] | ||
| + | note on this image the center clip has its opacity moved to the bottom, or a 0 value. You can adjust the opacity in this manner by using the selection tool( the arrow) and dragging the opacity line down to the bottom on of the clip. | ||
| Line 44: | Line 46: | ||
| − | If you have snapping turned on | + | Snapping is a feature in final cut that will jump to the nearest edit point or marker. |
| + | |||
| + | If you have snapping turned on, [[File:Snapping.jpg]] the razorblade will jump to the exact place your marker is placed once you get near it. You can also toggle snapping on and off by using the N key. | ||
| − | Snapping: This button give you the ability to have your video 'snap' to the closest available marker point or edit. When it is turned off you can move your video around with exact precision. When it is turned on, moving a clip close to another clip, a marker, or other edit point will give you the option of placing | + | Snapping: This button give you the ability to have your video 'snap' to the closest available marker point or edit. When it is turned off you can move your video around with exact precision. When it is turned on, moving a clip close to another clip, a marker, or other edit point will give you the option of placing the video at that exact point. Toggle snapping with the N button onthe keyboard. |
Revision as of 20:23, 20 July 2011
Ideas for teaching trainees on editing with the razorblade.
This wiki assume prior knowledge of using final cut pent tool/opacity settings and an understanding of syncing the good audio with the video.
Using the razorblade is a fast and easy way to edit in studio sessions or any project because it allows the editor to very easily see their cuts, make quick changes and utilize the keyboard for editing.
The first step to remember when using the razorblade is that is it VERY easy to get your video out of sync if you don't pay proper attention to the cuts you are making.
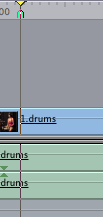
To avoid this issue. Do not delete any of your unusued clips, simply lower the opacity of each clip.
 note on this image the center clip has its opacity moved to the bottom, or a 0 value. You can adjust the opacity in this manner by using the selection tool( the arrow) and dragging the opacity line down to the bottom on of the clip.
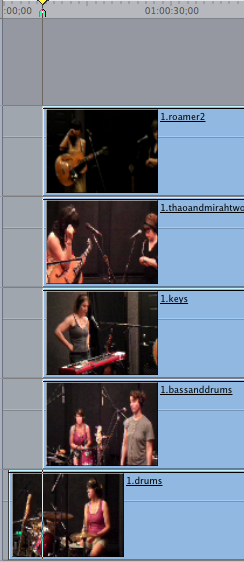
To set up a radio live performance video, stack your videos in your sequence putting what you think will be the least used shot on the bottom layer and your roamer shot on the top most layer ( if you don't have a roamer, use the video you think you will use the most)
Another way to think of this is to put the shot with the most action (the lead singer for example) on the top most layer then to go down the list ranking each shot of video best to worst/most interesting to least interesting.
Once you have these set and your good audio synced with the video, move your playhead to the beginning of the good audio. set a marker point.
1. by pressing m on the keyboard
OR 2. By going to Mark>Markers>Add
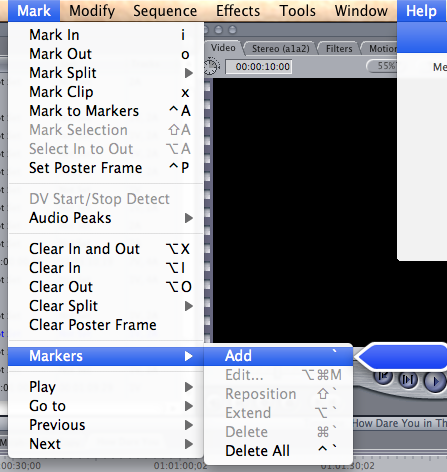
Be sure you do NOT have any clips selected/highlighted when doing this. The marker should appear in the timecode window
Use the razorblade tool (b) to cut all of the video layers at this marker point.
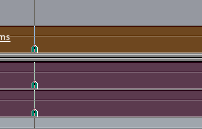
Snapping is a feature in final cut that will jump to the nearest edit point or marker.
If you have snapping turned on,  the razorblade will jump to the exact place your marker is placed once you get near it. You can also toggle snapping on and off by using the N key.
Snapping: This button give you the ability to have your video 'snap' to the closest available marker point or edit. When it is turned off you can move your video around with exact precision. When it is turned on, moving a clip close to another clip, a marker, or other edit point will give you the option of placing the video at that exact point. Toggle snapping with the N button onthe keyboard.
This category currently contains no pages or media.
